Showing posts with label foodpr0n. Show all posts

Thursday, July 19, 2012

recipe: s'mores icebox pie

I'm generally a proponent of making food from nothing more than recipe scraps, raw ingredients, motley kitchen equipment, and your own wits. Some days, that's just not feasible. Perhaps -- just for example, mind -- you spent the night before a potluck luncheon out until four in the morning watching Magic Mike and then, unrelatedly yet thematically, helping an erstwhile Atlantan introduce her new husband to the Clermont Lounge.

Perhaps not. The point here is that we all experience lapses in baking-from-scratch capacity, whatever the cause. For those days, it's good to have a backup plan that will allow you to maintain your reputation as an impressive baker with a minimum of work.

Enter the kitchen blowtorch.


s'mores pie


S'mores Icebox Pie
Idea adapted very, very loosely from Epicurious (more about that below). You'll need a culinary blowtorch -- I love mine. Serves eight to twelve.

INGREDIENTS

a prepared 9-inch graham cracker pie crust
a 5-6 oz. box (or the equivalent weight in smaller boxes) of your favorite stovetop chocolate pudding mix
whole milk OR half & half (however much the pudding box tells you you'll need)
a bag of marshmallows, regular- or mini-sized (you'll use ~5 oz.)
 
METHOD

Prepare pudding according to directions on box. If you've got some cocoa powder in the house, toss a couple tablespoons in there for bonus flavor. When it's thickened to your liking, immediately pour pudding into pie crust and smooth surface with the back of a large spoon.

Refrigerate -- uncovered if your fridge isn't stinky, or covered loosely with aluminum foil if it is -- for at least 3 hours, until pudding is more firm than wiggly. I don't recommend covering the pie with the crust package lid -- the crust will get soggy around the edges from condensation.

When everyone's just about ready for dessert, prepare your marshmallows. If you have mini marshmallows, this will consist of opening the bag. If you have larger 'mallows, cut them into rough thirds or smaller -- kitchen shears work best for this. Cut up enough to cover the entire surface of the pie in heaps.

Get your pie out of the fridge. (If you covered it, take care -- lots of condensation will have collected on the cover. Once it's off you can dab any droplets from the pie's surface with a paper towel.) Slice the pie.

Working with one slice at a time, plate the pie. Pile marshmallows on top of the slice at hand, completely covering the surface. Set your blowtorch's gas output to low and hold the torch 4+ inches away from the marshmallows. Roast 'em, rotating the plate to get as much caramelization from as many angles as possible. Blow out any lingering flames. Serve.


ADDITIONS, SUBS, AND ALTERNATE IDEAS:

You could probably add a tablespoon of whatever booze you like to the pudding during cooking for extra flavor. Whiskey or something orangey would be nice. And I'd be curious to see whether it'd be possible to use a jar of marshmallow fluff in place of the 'mallows.

Now, if you're having the kind of day where you feel like a superhero of baking, you could just go ahead and make the aforementioned Chocolate S'more Pie from Epicurious. I did that one Thanksgiving and it was fairly spectacular(ly messy):


IMG_6500
The marshmallow layer is browned under the broiler -- which the chocolate layer can stand up to 'cause it's a very thick baked custard.

IMG_6504
Photos by Maria Melee. At the moment, I was up to my elbows in molten marshmallow.


If you try anything different, let me know how it comes out!

Tuesday, May 17, 2011

so much editing it makes my face hurt

I got that job that I mentioned interviewing for in my last post! It is with HowStuffWorks, and it entails editing all the things. Which is brilliant, really -- I'd forgotten how much I missed editing full-time, and how fun a form of overwhelmed it is to face deadlines that overlap like verses sung in rounds while trying to learn several hundred nitpicky style rules.

Of course, I also started working on Blood Hunt, the sequel to The Blood That Bonds, for Chris Buecheler the week that I got the job, so I really have been editing all the things. Hence the lack of posts -- I've felt like my time hasn't really been my own lately, and I'm only going to get more intense about that over the next couple weeks while I finish my second run through the book.

In support, feel free to fax me British tea, European chocolate, and the good sense to not have three cups of mead at the Georgia Ren Fest and make large costume purchases based on the fabric texture of a bodice that may or may not be strictly appropriate for my body type.

Fax me the latter retroactively, if you would, so I'll have it in time for last weekend.

Or just take me to Doctor Bombay's Underwater Tea Party for high tea, because I am fueled almost entirely by sugar, caffeine, and eccentricity these days and they serve spreads like this:

High tea at Doc Bombay's Underwater Tea Party


Which is pretty much my own personal constructive insanity jackpot.

Monday, March 21, 2011

recipe: homemade marshmallows

Ever since I realized that it's within my power to make marshmallows, I, like a young god high on new-found might & processed sugar, have made a lot of marshmallows. I'm still experimenting with flavors but I've got the technique pretty well down, so I figured I'd share.

coffee mallows long


What follows is the base recipe. It's kinda long because a) I talk a lot and b) sugar is terrifying so I wanted to explain myself superextra clearly. To minimize v-scroll here, I'll do a followup post in a couple days with some notes on flavorings.

clementine mallows


homemade cocoa marshmallows


Homemade Marshmallows
Adapted from Alton Brown. You can watch the 'Puff the Magic Mallow' episode of Good Eats to see the general process, but I actually don't recommend following all of his instructions from that episode.
Makes ~24 1.5-inch marshmallows or ~32 1-inch marshmallows


INGREDIENTS

1 package gelatin
1/6 cup cold water

1/2 cup granulated sugar
1/3 cup light corn syrup
1/6 cup water
Pinch salt

1/3 tsp vanilla extract

1/4 cup cornstarch
1/4 cup powdered sugar

~1/2 tbsp butter or oil or etc. for greasing


EQUIPMENT

Stand mixer with whisk attachment
2 spatulas (preferably 1 stiff one for scraping and 1 large & softer one for pressing)
Medium saucepan
Bread pan
Fine-mesh sieve (you can also use a tea strainer with patience)
1 ramekin/small bowl
1 small (~1-cup) container with lid
Candy or probe thermometer
Timer


PREP

Working with sugar is scary because it requires both speed and caution. I like to prepare all of my ingredients & equipment before I start so's I won't forget something and end up with no place to put boiling edible napalm. So.

Prep the gelatin: Empty 1 packet of gelatin into a small bowl or ramekin. Add 1/6 cup of cold water (you can go over by a couple teaspoons), stir, and set aside to bloom (i.e., absorb the water and soften).

Prep the sugar: Add your sugar, corn syrup, salt, and 1/6 cup of water to a medium saucepan. You don't even need to stir it. Set aside.

Prep the powder coating: Measure your cornstarch and powdered sugar into a small bowl or resealable container. Stir to combine but don't worry about it being lumpy -- you'll be sifting it onto everything anyway. Set aside.

Prep the equipment: Grease everything. Grease the bowl of the mixer up to the rim. Grease the heads of 2 spatulas. Grease your bread pan up to the rim. If your cat likes to get all up in your fries while you're cooking, grease your cat. (It'll thank you later.) Use whatever fat and application method you like best -- I like peeling the paper back from the end of a stick of butter and rubbing it over the surface of the object to be greased, then using my fingers to apply the coat evenly and completely.

Okay.


METHOD

Set up your stand mixer so it's ready to go, and add the bloomed block of gelatin to the mixer bowl. Get out your candy or probe thermometer.

Next you're gonna cook the sugar mixture to the soft ball stage (240 degrees F/120 C). Place your saucepan full'o'sugarstuff over medium heat, swirling the pan occasionally to ensure even heating. (Because sugar likes being in a crystal state, you generally don't want to agitate sugar mixtures by stirring them -- if you stir, it'll be more likely for a rogue sugar crystal to become the nucleation center of crystallization and make the mixture go grainy. Corn syrup, being syrupy & therefore a stabilizer, helps prevent that, and that's why candy recipes call for it.) When the sugar starts to bubble, place your thermometer of choice in the pan and swirl the mixture continually until the sugar reaches 240 degrees F (120 C). Immediately take the pan off the heat. Turn your stand mixer on its lowest setting, and slowly (carefully, respectfully) pour the sugar syrup down the side of the mixer bowl towards the bottom. The goal here is to keep the syrup moving without risking it hitting the whisk and splattering you. That would be bad.

Once all/most of the syrup is in the mixer (a little syrup loss is totally acceptable), crank the mixer up through its settings until it's going full-tilt. Set a timer for 15 minutes.

While the mixer's doing its thang, prepare your bread pan: Put a tablespoon or two of your powder mixture in the fine-mesh sieve and tap a good, thick layer of powder into the bottom of the pan, and a finer coating up along the sides. Unlike buttering & flouring a pan for baking, you don't want to tap the edges of the pan to move the powder around -- it'll clump and stick. Just sift it in there and set the pan aside until the timer goes off.

When the timer goes off, peer into your mixer bowl and take note of the texture of the batter -- it'll be sticky and stringy as the whisk moves through it. Measure out your vanilla extract, turn the mixer speed down to low, and pour in the vanilla. Give it a few seconds to incorporate, then turn the mixer speed back up to high for ~1 minute, or until the 'mallow batter reaches about the same stringy consistency that it had before you added the vanilla.

Time to get the marshmallow batter into the pan. You'll have to work very quickly because the batter will become stiff and difficult to remove from the mixer's bowl in less than a minute. Put your greased spatulas within reach and turn off the mixer. Clean off the mixer's whisk first, using one spatula to gather batter and the second to scrape the batter off the first spatula and into the mixing bowl (or straight into the waiting bread pan, whichever's easier depending on your mixer setup). Using the same gather/scrape method, firmly scrape the rest of the batter out of the mixing bowl and into the pan. You can just kinda glop it in there -- the important thing is getting as much as possible out of the bowl before it sets.

Once you've got all the batter you're gonna get in the pan, use your spatulas to press the batter down into the pan evenly, pushing it into the corners and flattening it out. You should still be working kinda quickly, but this part is much more forgiving. Don't be afraid to press down pretty firmly. If any unaesthetic ridges or stringy trails form along the surface, just run your hands under the faucet, flick off the excess water, and gently smooth the batter out with your damp fingertips.

When you're satisfied with your 'mallow loaf, set the pan somewhere where it won't be disturbed for ~4 hours (or up to overnight). You can tent it very loosely with tin foil or a paper towel if you're afraid of things (dust, kids, dogs, etc.) getting into it, but you really want the loaf to be able to breathe and dry out, so don't cover it completely.

(Cleaning up after this step won't be as terrifying as it seems 'cause marshmallow goo, while tough to wrangle out of a bowl and into a pan, is easy to wash up. It's made entirely of things that dissolve in water. Yay science!)

Once the loaf has rested for 4+ hours, get out a cutting board and sift a good layer of your powder mix on its surface. Sift a layer of the powder on top of the 'mallow loaf, too, then turn the loaf out onto the cutting board. Cut the loaf into 3 or 4 strips lengthwise, dust the whole thing with more powder, and dip the cut edges of the strips into the powder on the board. Then push the strips back together into loaf form and cut the strips widthwise into squares (or rectangles, rhombuses, or other quadrilaterals; no one will care if the delicious homemade marshmallows you give them are kinda misshapen). Dust the whole thing with yet more powder.

Pull one of the marshmallows away from the rest, dip each cut side in the powder on the board, and then dust the excess powder off with your fingers, taking special care to make sure that there's no buildups of powder stuck in the marshmallow's crags and crevices (that would not be delicious, and can get gross and grainy if you let it sit).* Toss the finished marshmallow back into a large plastic bag (don't cramp your 'mallows). Repeat with each of the marshmallows.

*Boyfriend's hack for this step, which works nearly as well and takes like three seconds rather than 15 minutes: Pull a couple handfuls of well-powdered marshmallows apart from each other and toss them in a colander, then, over your sink, shake and toss the marshmallows to coat with powder.

You can store the marshmallows for up to a month in a sealed plastic bag or other airtight container -- they might get a bit stale around the edges after the first couple weeks, but will still be delicious, especially when roasted over fire/melted in cocoa.

Saturday, January 15, 2011

foodpr0n: homemade cocoa marshmallows

The first thing you learn when you make marshmallows from scratch is that Ghostbusters was lying to you. That is not how marshmallow goop behaves. (They used shaving cream.) Actual marshmallow goop is far more insidious, more inexorable, more sticky than the deceptively benign horrors that our comedic but intrepid heroes faced back in 1984.

That said, the payoff of working with marshmallow goop is well worth the effort:

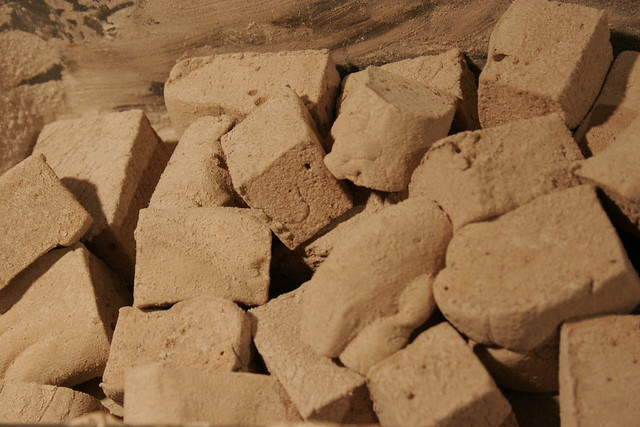
homemade cocoa marshmallows tumbled in a pan

I'd be posting a recipe right now, but at this point I'd just be plagiarizing Alton Brown's excellent instructions. I'll get back to you later, once I've had the chance to perfect a few wacky flavors.

These cocoa marshmallows were made exactly according to Alton's recipe, except I only made 1/3rd of the recipe (which fit perfectly in a bread pan) and added 1 tablespoon of cocoa powder to the 'mallow batter in addition to the vanilla (having turned the beater speed down first and up again afterwards to prevent splatter), plus another 2 teaspoons of cocoa powder to the cornstarch/powdered sugar coating mixture.

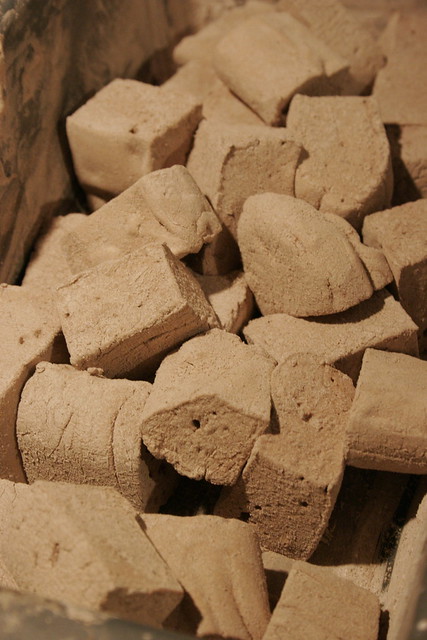
more closeup detail of homemade cocoa marshmallows

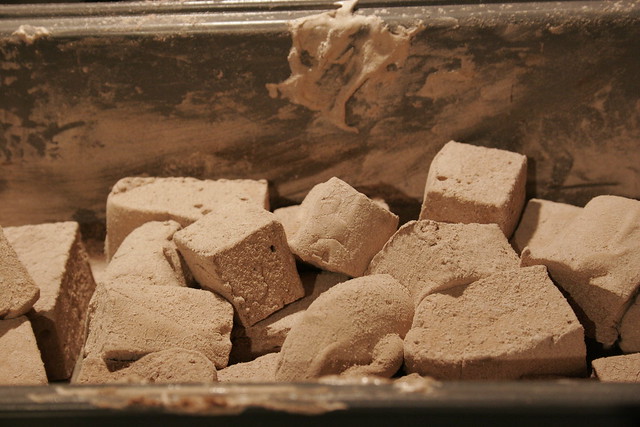
homemade cocoa marshmallows in a messy pan

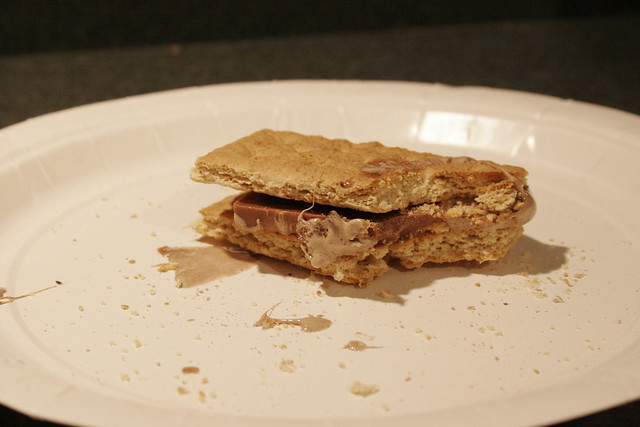
Of course, s'mores had to happen immediately.

a s'more made with a homemade cocoa marshmallow and Lindt milk chocolate

The only potential downside here is that now I want to make marshmallows in all the flavors. Like banana, and espresso, and Nutella, and whiskey, and caramel, and chai, and Earl Grey. It'll be the tastiest pain in the ass there ever has been.

Friday, December 24, 2010

recipe: linzertorte

Some facts about the linzertorte: 1) It is basically an almondy cookie cake. 2) It is filled with raspberry jam. 3) It is spiced to taste like Christmas. 4) The amount of effort it takes to make < the amount of impressed your friends & family will be.

By "facts" I might've meant "reasons why linzertortes are a holiday tradition in my family". Here is one additional reason:

linzertorte

I never feel like it's really the holidays until I've made one of these. It's the perfect thing to take to parties, and can safely be made a day or two ahead (fact 5: it's tastier after a day or so) and/or in steps, as your schedule allows.

Linzertorte
Adapted from The Joy of Cooking, Not Derby Pie, and The Joy of Baking.
Serves ~12 (it's very rich, so small wedges will do)


INGREDIENTS

1 1/4 c. all-purpose flour (If you like/have white-whole-wheat, 1/2 c. of that plus 3/4 c. all purpose also works)
1 c. almond flour (or fine-ground blanched [skinless] almonds)
1/2 tsp cinnamon
1/4 tsp cloves
1/4 tsp salt
1 tsp lemon or orange zest (1 lemon or ≥1/2 orange worth)

2/3 c. white granulated sugar
3/4 c. (1.5 sticks) butter
2 egg yolks

1 1/4 c. (~1 jar, ~10 oz.) tasty raspberry preserves
2 tbsp fresh-squeezed lemon or orange juice


METHOD

Add your dry ingredients into a medium bowl (you can zest the citrus straight into the bowl to capture all the good zesty oils) and whisk to combine.

In a large bowl, cream together the butter and sugar for ~3 minutes, until they've lightened in color and texture. Beat in the egg yolks for ~1 minute until well incorporated. Stir in the dry ingredients, 1/3rd-ish at a time, until well combined.

Divide the mixture into 2 parts, one a bit larger than the other -- about 60%/40%. Ball & smush one part in your hands until it's happy (read: non-crumbly) enough to stay in ball form, then flatten it slightly into more of a disc. Do the same for the other! Wrap each disc separately in plastic/foil/a sandwich bag and pop them both in the fridge. They need to chill for 30 minutes at the very least, and preferably at least an hour. They will not be harmed by hanging out in there for a whole day, in fact, if you find that you've got Other Things To Do.

When the dough is chilled and you're ready to bake, butter & flour a 9-inch springform. (A cake or tart pan would also work, provided it's at least 2 inches deep.) Prepare to roll your dough out: sprinkle some flour on a large surface (I like sticking a piece of wax or parchment paper to the counter with a few drops of water and rolling on that for ease of turning the dough and moving it into the pan, but your mileage may vary if you can't get the paper to stick), get some flour on your clothes/face/hair, rub your rolling pin down with some flour, panic.

Next, stop panicking. This is not pie crust, this is cookie crust. It's really forgiving. Take out the larger piece of dough and roll it out into a big, evenly thick, mostly circular shape that's ~1-2 inches larger in diameter than your pan. A few cracks around the edges are okay -- just pinch them back together. Drape the dough down into the pan as centeredly as possible and press the bottom down and the sides up. The sides need to be 1/2 to 1 inch high -- just high enough to hold your jam. You can smoosh the dough around, breaking chunks off where there's too much and adding them where it's sparse -- like I said, not a pie crust.

This is a good time to preheat your oven to 350 degrees F.

Measure out your jam into a small bowl and mix in your citrus juice, then pour/spread the mixture evenly into the crust.

Take the second half of the crust out of the fridge and roll it out into an oval that's about as wide as your pan the short way across -- it'll be a bit thinner than the bottom crust was. With a large, flour-dusted knife, slice it width-wise into strips 1/2 inch wide.

Now, if you're very motivated you could lattice the strips properly across the top of the jam-filled crust, but what I do is just lay one set of strips down across the top, 1/2 inch apart and parallel to each other, and then lay a second set down perpendicular to and right across the top of the first set. It'll still look plenty pretty. If you do it my way, I think it's helpful to start in the middle with the longest pieces and move towards the edges with shorter pieces.

Either way, you're going to want to press the ends of each strip down into the edge of the crust. Trim off any extra lengths and smoosh them down into any gaps between the strips, and use any leftover dough to further even out the rim of the crust. I like rolling the excess dough into snakes and using strips & bits of those to fill in the gaps.

I brushed an egg wash onto the linzertorte pictured (beat 1 egg with a fork and then use a pastry brush to spread a thin layer over the crust), but it's not necessary. Iiii actually think it's prettier without it.

Pop the torte in the oven and bake for 40 minutes, or until it smells lovely and the crust is golden brown and pulling away from the edges on the pan. It'll be crumbly & sorta dry when it's warm and will get better the longer you let it sit, so try to let it cool completely before serving -- it might take a couple hours. You can decorate it with a bit of powdered sugar (put a tablespoon or two in a fine mesh sieve and tap the edge while holding it over the torte to sprinkle it on) if you like. The torte will be even nicer the next day, once the jam has had a chance to seep into the crust a little and all the flavors have really melded, so I recommend baking it a day ahead if you have time, or saving a slice for breakfast if you don't. Just seal it up in airtight containers and finish it within a week or so if there happens to be any leftover.

Thursday, November 25, 2010

Thanksgiving can also have tricks and treats

Happy Thanksgiving, American compatriots! If you're looking for something to do with that extra bag of cranberries you accidentally bought, I recommend sugaring them for a pretty table setting/delicious cranberry candy 2-hit combo.

sugared cranberries on a table set for Thanksgiving dinner

My contribution to the dessert table this year will hypothetically be this Pear Butterscotch Pie from Epicurious. "Hypothetically" because it's in the oven right now, and it's looking a lot more like one of Mrs. Lovett's pies than the thing in Gourmet's picture, and we're out of tin foil so I can't tent the edges of the crust to prevent overbrowning. [Though really, if I manage to not set it on fire I'll be doing better than I have with Thanksgiving dishes in the past. (I apparently only bust out the en fuego accidental for special holiday occasions. It's the best hostess gift ever? It's thematically warm & stressful?)] Will let you know how it turns out!


In the meanwhile, a non-caloric holiday treat: a new episode of Consumerism WOW by Adam & me! Adam picked the things we talked about this month, including but not limited to this shirt design:

Thing #5


a happy exclamation point
Lauren: Your dour demeanor so frequently belies your gleeful mood that you want to reassure people that on the inside, you are super excited about everything. OR you want to trick people into thinking that you’re super excited about everything so they’ll be off their guard for the unequivocal pants-kicking that you’re about to deliver them.

Adam: Well now that you explained about the pants-kicking my success rate at fooling people is going right in the toilet! And hey, I’m not dour, Lauren! I am inscrutably magi-cranky, thank you very much.


Visit Adam's blog to discover his nefarious consumer desires and learn some Science! He sure learned me about rainbows.

Friday, November 12, 2010

recipe: Not Quite Mom's German Apple Cake

Halloween may have super-sneak-ninja attacked me this year, but I had Fall all figured out. The day that the scent of cinnamon brooms battered me at my first step into my local grocery store, I bought some Granny Smith apples, went home, and apropos of no greater occasion than the season made this version of my mom's German apple cake.

cake topped with chopped apples, with a wedge cut out

If you wanted to be proper about it, you'd use all white flour and all white sugar in this cake to achieve the sweetest richness, and you'd slice the apples thin-thin-thin for galette-style decoration and chewy caramelization. My modifications yield an earthier, more everyday cake for those of us who don't own a mandolin and have come to comfortable terms with the fact that we'll wind up eating leftover cake for breakfast, and will feel better about it if there's a bit of whole wheat flour involved.

Dense and buttery with a bright, tart kick from the apples and a warming touch of cinnamon, this cake is Fall comfort. Unmodify it for a fancy party treat, or try my relaxed version for a laid-back, party-optional sort of thing.


Not Quite Mom's German Apple Cake
Serves 8-12 people.


INGREDIENTS

3 granny smith apples
1 1/2 tsp ground cinnamon
1/4 cup sugar
half a lemon, de-seeded as best as possible

2/3 cup all-purpose flour
1/3 cup whole wheat flour
1 tsp baking powder
1/2 tsp salt

2/3 cup white granulated sugar
1/3 cup brown sugar
1/2 cup unsalted butter, softened
2 eggs
1 tsp vanilla extract (or 1/2 vanilla bean, scraped)
2 tbsp bourbon, if you've got it


METHOD

Peel & core your apples, slice them into wedges, and chop the wedges into roughly equal-sized chunks. As you go, place the resulting applebits in a medium bowl, tossing them with a squeeze of lemon juice to prevent browning each time you add a batch. Once all 3 apples are chopped, add the cinnamon & sugar and toss/stir/muss about with your hands to coat the apples. Set aside to macerate (i.e., soak & soften) while you prepare:

A pan! V. important to the cake-making process. I used a 9-inch springform for the cake in the photo, but a larger round or square should work so long as you shorten the baking time. Butter and flour your pan of choice and set aside.

Set your oven to 350 degrees F.

Measure your dry ingredients out into a medium bowl and whisk gently to combine.

In a larger bowl, with an electric mixer on medium speed, cream together your butter and sugar for ~3 minutes or until the mixture has lightened in color and texture (indicating that cake-buoying air has gotten into it). Add the eggs, vanilla, and optional bourbon and beat for another 2 minutes to combine thoroughly.

Add your dry ingredients to you wet ingredients and stir with a spoon/spatula/other nonelectric device to combine. The batter should be shiny and smooth (keep stirring if it's not). Pour it into your prepared pan and wiggle the pan to distribute evenly.

Drain most of the liquid from your apples (they can be wet but shouldn't be dripping) and scatter the pieces across the top of the batter, pressing them in just slightly.

Pop the pan in the oven and bake for 60 minutes. Well, check it around 50 minutes. You're looking for the sides of the cake to be deep golden and pulling away from the pan, for the liquid between the apples to be sizzling merrily, and for little bits of batter to be poking up between the pieces of fruit.

Remove from the oven and let cool in the pan until said pan is handleable, then either remove it from the springform, carefully flip it out of your non-springform pan (using a plate to flip with instead of a wire rack), or simply slice and serve the cake from where it is. Seal tightly and refrigerate any leftovers, which should keep for a week.


*If you leave it in the oven too long, no worries: you can abuse this cake and it'll still come out okay. As long as it's not actually charred, just stick it in the fridge in a tightly covered container overnight and it'll be lovely and moist the next day. When you eat it for breakfast. Because that's what responsible adults who have used whole wheat flour do.


[I previously posted an iteration of this recipe done with pears instead of apples, which is lovely if you have heathens friends who dislike cooked apples.]

Friday, July 16, 2010

kickstarter and cobbler

My musically inclined friend Juliana, who also blogs at write.play.repeat. and Bear & Honey's Clueless To-Do List, is working on 2 new albums! They're going to be seasonally themed sorts of things, which -- I tell you in case you're unaware that Juliana is an incarnate of Mama Nature via a) the 80s and b) the Internet -- is highly appropriate.

Juliana Finch in Piedmont Park
She's using the faboo Kickstarter.com to raise funds, and you should toss monies her way 'cause I really want to hear what she's working on. Erm. And for other, less monkey-serving purposes as well (I guess), like "advancing the arts" or "I want advance-release copies of the albums and/or an in-home concert for myself." You can sample and purchase her previous EP and LP on CD Baby (I particularly recommend "Rattlesnake" from How to Take the Fall), though donating 25 bux on Kickstarter will earn you both of those AND both of the new albums once she's all funded and finished. Just sayin'.


In baking news, I've been making all the cobbler lately -- cherry, blackberry, and peach in just the past two weeks. I think the peach was the most successful -- I grated a maybe 1/4 tsp of nutmeg over the peaches and added maybe 1/2 tsp of vanilla extract while they were mascerating, and yeah. Heavenly.

peach cobbler, with a biscuit in the shape of a star
I've been using a bottom crust from smittenkitchen's apple tart and a biscuit topping (with hard-boiled egg yolks instead of raw!) from her rhubarb cobbler. My only advice if you try this is to prepare a LOT of fruit -- ~3 quarts of cherries, blackberries, or other things that come in quarts, or at least 10 peaches or other pieces of single-serving fruit. Just mascerate whatever fruit you're using in 1/2 to 1 cup of sugar (depending on the natural sweetness of the fruit) while your crust & biscuits are chilling, then assemble, bake, and feel like a rockstar.