Showing posts with label chocolate. Show all posts

Thursday, July 19, 2012

recipe: s'mores icebox pie

I'm generally a proponent of making food from nothing more than recipe scraps, raw ingredients, motley kitchen equipment, and your own wits. Some days, that's just not feasible. Perhaps -- just for example, mind -- you spent the night before a potluck luncheon out until four in the morning watching Magic Mike and then, unrelatedly yet thematically, helping an erstwhile Atlantan introduce her new husband to the Clermont Lounge.

Perhaps not. The point here is that we all experience lapses in baking-from-scratch capacity, whatever the cause. For those days, it's good to have a backup plan that will allow you to maintain your reputation as an impressive baker with a minimum of work.

Enter the kitchen blowtorch.
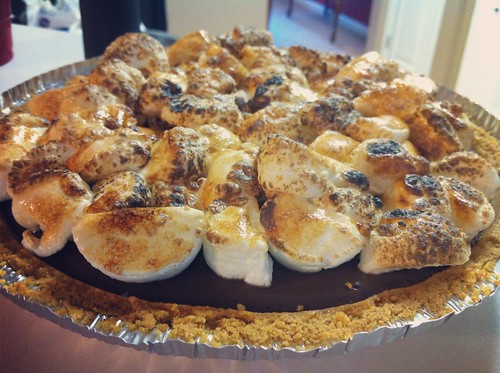


s'mores pie


S'mores Icebox Pie
Idea adapted very, very loosely from Epicurious (more about that below). You'll need a culinary blowtorch -- I love mine. Serves eight to twelve.

INGREDIENTS

a prepared 9-inch graham cracker pie crust
a 5-6 oz. box (or the equivalent weight in smaller boxes) of your favorite stovetop chocolate pudding mix
whole milk OR half & half (however much the pudding box tells you you'll need)
a bag of marshmallows, regular- or mini-sized (you'll use ~5 oz.)
 
METHOD

Prepare pudding according to directions on box. If you've got some cocoa powder in the house, toss a couple tablespoons in there for bonus flavor. When it's thickened to your liking, immediately pour pudding into pie crust and smooth surface with the back of a large spoon.

Refrigerate -- uncovered if your fridge isn't stinky, or covered loosely with aluminum foil if it is -- for at least 3 hours, until pudding is more firm than wiggly. I don't recommend covering the pie with the crust package lid -- the crust will get soggy around the edges from condensation.

When everyone's just about ready for dessert, prepare your marshmallows. If you have mini marshmallows, this will consist of opening the bag. If you have larger 'mallows, cut them into rough thirds or smaller -- kitchen shears work best for this. Cut up enough to cover the entire surface of the pie in heaps.

Get your pie out of the fridge. (If you covered it, take care -- lots of condensation will have collected on the cover. Once it's off you can dab any droplets from the pie's surface with a paper towel.) Slice the pie.

Working with one slice at a time, plate the pie. Pile marshmallows on top of the slice at hand, completely covering the surface. Set your blowtorch's gas output to low and hold the torch 4+ inches away from the marshmallows. Roast 'em, rotating the plate to get as much caramelization from as many angles as possible. Blow out any lingering flames. Serve.


ADDITIONS, SUBS, AND ALTERNATE IDEAS:

You could probably add a tablespoon of whatever booze you like to the pudding during cooking for extra flavor. Whiskey or something orangey would be nice. And I'd be curious to see whether it'd be possible to use a jar of marshmallow fluff in place of the 'mallows.

Now, if you're having the kind of day where you feel like a superhero of baking, you could just go ahead and make the aforementioned Chocolate S'more Pie from Epicurious. I did that one Thanksgiving and it was fairly spectacular(ly messy):


IMG_6500
The marshmallow layer is browned under the broiler -- which the chocolate layer can stand up to 'cause it's a very thick baked custard.

IMG_6504
Photos by Maria Melee. At the moment, I was up to my elbows in molten marshmallow.


If you try anything different, let me know how it comes out!

Saturday, January 15, 2011

foodpr0n: homemade cocoa marshmallows

The first thing you learn when you make marshmallows from scratch is that Ghostbusters was lying to you. That is not how marshmallow goop behaves. (They used shaving cream.) Actual marshmallow goop is far more insidious, more inexorable, more sticky than the deceptively benign horrors that our comedic but intrepid heroes faced back in 1984.

That said, the payoff of working with marshmallow goop is well worth the effort:

homemade cocoa marshmallows tumbled in a pan

I'd be posting a recipe right now, but at this point I'd just be plagiarizing Alton Brown's excellent instructions. I'll get back to you later, once I've had the chance to perfect a few wacky flavors.

These cocoa marshmallows were made exactly according to Alton's recipe, except I only made 1/3rd of the recipe (which fit perfectly in a bread pan) and added 1 tablespoon of cocoa powder to the 'mallow batter in addition to the vanilla (having turned the beater speed down first and up again afterwards to prevent splatter), plus another 2 teaspoons of cocoa powder to the cornstarch/powdered sugar coating mixture.

more closeup detail of homemade cocoa marshmallows

homemade cocoa marshmallows in a messy pan

Of course, s'mores had to happen immediately.

a s'more made with a homemade cocoa marshmallow and Lindt milk chocolate

The only potential downside here is that now I want to make marshmallows in all the flavors. Like banana, and espresso, and Nutella, and whiskey, and caramel, and chai, and Earl Grey. It'll be the tastiest pain in the ass there ever has been.

Saturday, October 2, 2010

creature comforts in Boston

New job has been full of learning curves! Thrilling, anxiety-inducing, curly-wurly learning curves. But it's also been full of friendly, nerdly people, being encouraged to tweet for fun & profit, and a trip to Boston during which the aforementioned nice people introduced me to restaurants with delicious foods.


My first night in town, after a ridiculously long day of travel/office shenanigans, extraface, @rubicantekid, and I grabbed pre-collapse dinner at Chutney's, which lives in a tiny food court space in The Garage on Harvard Square. It's an Indian fast-food sandwich shop -- like Subway (a franchise of which the owner also runs), except the breads you choose from include naan, roti, and paratha, the components you choose from include aloo chana, basmati rice, lamb kabob, and chicken tikka, and I've never been offered tamarind chutney at a Subway. I got the paneer tikka with rice, tomato, cucumber, and mint & tamarind chutneys on naan. They smooshed the ingredients inside the naan and then toasted the whole thing in a panini press, and it was near-terrifyingly unabashed comfort/junk food, the textures all gradients of soft and the flavors warm & savory-sweet with just a touch of heat. I very much recommend the place to hungry students and weary travelers.


The following night, with a bit more planning & wherewithal, extraface, Ian, and I headed to Central Kitchen in Cambridge on Central Square. Tucked into a space no larger than Brick Store minus the Belgian Bar, Central Kitchen's cozily dim tables and short, seasonal menu of increasingly intriguing comfort foods made me feel instantly at home. The craft cocktail list, beginning with the old-standard Aviation, helped too. My Tom Collins concocted with house-made rosemary simple syrup was somehow refreshing and savory at the same time in a way that was lovely rather than conflicting.

For food, Ian and I shared a daily-special appetizer of spreadably soft, creamy chicken livers with rich balsamic gravy and a kick of sweet & sour cooked berryish things (currents, maybe?) over soft, just-caramelized toast -- which was pretty much transcendental. Dave had the cocktail shrimp, which were elegantly presented and reportedly delicious. My entree of seafood bouillabaisse was a tad bit salty, but the squid, mussels, and clams were all perfectly chewy-tender, and the cod, shrimp, tomatoes, and saffron conspired to make the broth both bright & rich. We tried two of the desserts -- a baked chocolate pudding that was nearly sensory overload (think solid, spoonable hot chocolate) and a deceptively simple butter cake with berry sauce (like a warmer, denser berry shortcake). I absolutely recommend Central Kitchen to gastro-geeks.


Let me know if there's anywhere in particular I need to go the next time I'm up Boston-way!

Monday, March 8, 2010

recipe: chocolate Guinness cookies

I made these beer-flavored cookies for the Great Guinness Toast a couple weeks ago. The recipe is cobbled together from my double-chocolate bacon cookie base and this White Beer Cookie recipe from an episode of Ultimate Recipe Showdown on Food Network that I never watched, but discovered anyway through the wonderment of Google dot com.

They took a bit of trial and error -- I wound up using sugar in the beer syrup instead of honey (which overpowered the Guinness), and my attempt to compensate for the sugary beer syrup by adding less sugar to the dough created tiny cakes rather than less-sweet cookies. (I do the Science so you don't have to.) The end result was a cookie with a hit of chocolate at first taste and an addictively bitter bite at the back of the palate. They go perfect with a pint! And if you're looking to bring something to a St. Patrick's Day party, I can guarantee that adding stout to cookies will make them more Irish than green food coloring.

Chocolate Guinness Cookies
Makes ~24 cookies. Adapted from Kathy's chocolate cookie recipe on Allrecipes.com and from Sean LaFond's White Beer Cookies, with thanks to Sarah's Sweet Tooth for testing.


INGREDIENTS

Guinness syrup

2 bottles of Guinness (12 oz each)
5 tbsp sugar

Cookies

1/2 cup (1 stick) unsalted butter, softened
2/3 cup white sugar
1/3 cup brown sugar
1 egg, room temperature
1 teaspoon vanilla extract (or 1/2 a vanilla pod, scraped)
1/3 cup prepared Guinness syrup

3/4 cup all-purpose flour
1/3 cup cocoa powder
1/8 teaspoon salt
1/2 teaspoon baking soda [NOTE: If you're using Dutch-process (aka pre-alkalized) cocoa powder, you should use baking POWDER instead. Otherwise you'll end up with oven-baked pancakes.]

1 tbsp powdered (confectioner's) sugar for pretty


METHOD

Set out your butter and egg first to allow them to start warming up to room temperature.

For the Guinness syrup, pour both bottles of beer into a small saucepan and add the sugar. Set the pan over medium-high heat and bring the liquid to a boil, stirring to help the sugar dissolve. When the liquid hits a boil, lower the heat to a busy simmer and let the liquid reduce to a syrup, stirring more than occasionally but less than frequently. It'll take 20 minutes or more -- you're looking for it to become a rich amber color, and gain the consistency of thin honey or thick maple syrup. Also, it'll begin foaming really aggressively when you stir it (more aggressively than that... wait for it...) and will be almost exactly 1/3 cup in volume.

Take the saucepan off the heat and transfer the syrup to a small dish to allow it to cool down.

Get your oven preheating to 350.

In a medium mixing bowl, combine your dry ingredients (flour, cocoa, baking powder or soda, and salt) and stir with a whisk to fully incorporate. (This helps break up any clumps and get the leavening agent fully distributed.)

In a large mixing bowl, combine your softened butter (you can just nuke it for a few seconds if, like some authors of this recipe, you forgot to set it out earlier) and your white & brown sugars. Cream them together with an electric blender on medium speed for 2-3 minutes, until the mixture has lightened in color and begun to hold the wavey shapes that the beaters sculpt it into as they pass through it. Add your vanilla, egg, and Guinness syrup, and blend for another minute or so until everything is incorporated.

Put down the beater! You'll want to use a spoon or spatula for this next part so that you don't overwork the flour. Add the dry mixture to the wet mixture and stir gently (but, y'know, firmly) until no dry pockets remain. The dough will be sticky.

Butter and flour a baking sheet (unless it's REALLY high-quality nonstick). Roll a rounded teaspoonful of dough into a ball in your hands and then flatten it slightly before placing it on the sheet, and repeat until you fill the sheet, leaving a couple inches between each cookie. (If you don't like getting your hands dirty, you can drop the dough onto the sheet directly from the spoon and flatten it slightly once it's on there, but I find that they come off easier when you do the flattening beforehand.)

Pop the sheet in the oven and bake for 8-10 minutes, or until the tops of the cookies look dry and provide a bit of springy resistance when you poke them (carefully, folks) with a fingertip. Remove the sheet from the oven and allow the cookies to continue cooking on it for a couple minutes before transferring them to a rack (preferred) or plate (less preferred) to cool.

For the pretty: Once the cookies are cool to the touch, put maybe a tablespoon of powdered sugar in a fine mesh sieve and hold the sieve over the plate of cookies. Tap the edge of the sieve to dust the powder onto the cookies. Pretty! (If you're feeling more ambitious than I was that night, a perfect topping/decoration might be a drizzle of white chocolate. Maybe with a bit of Irish cream mixed in carefully as the chocolate cools?)

I can't tell you how they hold up after the first day 'cause none of them survived the night. If you find out, you tell me. (Hypothetically, they should do okay in a sealed container for a day or two before they start going stale, and 10 seconds or so in a microwave should help perk them up after that.)

Wednesday, February 3, 2010

recipe updates, the lack thereof, and ingredient fangirlery

Citrus season! It's my favorite. Last week I bought a box of clementines and revisited this clementine cake recipe -- except, just to experiment, I subbed half the almond meal for white flour, and added two tablespoons of butter, and coated it in a thick ganache (double the recipe) instead of just a sprinkle. Came out better than the original, I thought, if you don't mind it not being gluten-free. (Though you could, instead of white wheat flour, use an equal amount of sifted rice flour). Next time I'm thinking I'll add maybe a quarter teaspoon of ground cloves to the batter to make it taste just a little like Christmas.

Having yet more clementines to use before they went all squishy, I boiled another one for a couple hours and pureed it like I would've for the cake, but then added the puree to this oatmeal cookie recipe (instead of the tangerine zest). Completely awesome. Also, instead of the drunken raisins, I made a half batch (half a bag) of sugared cranberries, except I just drained them (instead of draining and coating with sugar) after they were done cooking, and then stirred/mashed the cooled cranberries into the oatmeal cookie batter. They were a tiny bit tart, but played really well with the clementine flavor. Just add a minute or two to your bake time -- the cranberries contain a lot more moisture than raisins, so these cookies will need it.

In not-changing-recipes news, I made these cocoa-only brownies that momma Deb of smitten kitchen posted a recipe for, and I never missed the melted chocolate. At all. Best fudgey brownies ever. Wouldn't change a thing. (Though if you can find some and don't mind shelling out a few cash dollars, I absolutely recommend Droste cocoa powder. My local Whole Foods carries it, and it's available on Amazon, and it's dark and rich and so deep that it has a tinge of berry flavor. And the box doesn't have a scary nurse on it anymore, but apparently that design is where the term Droste effect came from, so I thought I'd show you the picture anyway.) But yeah, go make these.

Also, guys, a word about whole wheat flour. (This is partially a note to self, 'cause I keep forgetting.) You can safely substitute a quarter of the white flour in a recipe for whole wheat flour, and it'll add a bit of a nutty flavor (and nutrition) but won't really impact the texture or taste. Substituting out a third of your white flour for whole wheat is pushing it, texturewise. More than that, and you'll have a grainy yucky thing on your hands.

Anyone know of any good resources for recipes that are meant to use whole wheat flour? Also, has anyone tried any of the "white whole wheat" flours that're on the market? King Arthur makes one, and I trust them (and their geeky baking & management ethics) utterly, but haven't tried it. (p.s. -- If you aren't following their blog, you should go do that. 'Cause sometimes they put pudding on top of cake and then brulée the pudding. You heard me.)

Monday, October 5, 2009

recipe: chocolate chip pecan brown-butter cookies

These cookies were inspired by a brown-butter cookie that Maria (MommyMelee) makes, my personal quest for the Ultimate chocolate chip cookie, and a random craving for pecans. They bake up thick and soft, with a crisp-crunchy edge and a nutty richness from the pecans and browned butter.

For anyone who's never done it, browning butter is magical, and something I think I want to do for all my recipes that call for melted butter from now on. Similar to how toasting nuts or searing meats brings out their full flavors, gently cooking butter before using it in a recipe deepens the taste and color of the final product. The outcome in these cookies is a decadent and craveable comfort food.

Chocolate Chip Pecan Brown-Butter Cookies
Adapted from Deb @ smittenkitchen, who adapted it from AllRecipes.com.

INGREDIENTS

3/4 cup (a stick and a half) unsalted butter

2 cups all-purpose flour
1/2 teaspoon baking soda
1/2 teaspoon salt

1 cup packed dark brown sugar (light would be fine too)
1/2 cup white sugar
1 tablespoon vanilla extract
1 egg
1 egg yolk

2 cups semisweet chocolate chips
1/2 cup pecans, finely chopped

METHOD

First, get your butter browning: Cut your butter in chunks into a small, shallow pan, and set it over low heat. Really low. Just above "warm", and certainly not as high as medium. The idea here is to just toast the butter -- you want it to melt & separate, and then get just hot enough so that all the milk solid bits sink to the bottom, and then cook just long enough so that those milk bits caramelize, becoming fragrant and turning a lovely warm shade of golden brown. The whole process should take maybe 5 to 10 minutes, and your butter should bubble but never go above a simmer. Stir it frequently to keep all the milk bits from sticking to the sides or bottom of the pan. When the color has deepened and the butter smells like maybe you want to stick your face in it, take the pan off the heat and set it aside.

Meanwhile, or afterwards if you don't like multitasking, preheat your oven to 325°F. Take your chopped pecans (I like them to be pretty much minced with a few slightly larger chunks 'cause I don't like too much crunchy texture in my cookies, but you can adjust to taste -- I'd say anything up to pea-sized chunks would work), spread them onto a baking sheet, and pop them in the warming oven for 5-10 minutes or until they're fragrant and have slightly deepened in color. Set them aside.

Measure out your dry ingredients (flour, baking soda, and salt) and whisk them to combine.

In a separate, larger bowl, measure out your sugars and add in the browned butter. Beat them together with an electric mixer for about 2 minutes on medium. You're looking for the mixture to increase a bit in volume and lighten a bit in color. Add the vanilla and eggs, and beat for about a minute until the mixture is creamy and well incorporated.

Put down the beater, and mix in the dry ingredients by hand (well, by spoon/spatula, unless you really want to use your hands). Then gently fold in the chocolate chips and the toasted pecans. The dough will be soft and sticky, and at this point, you could refrigerate it for up to 24 hours before baking. (David Leite, who I trust in all things, researched & recommends refrigerating cookie dough for about this long to allow everything to combine & settle into itself. Guys, I don't have 24 hours' worth of cookie foresight. If you happen to, though, let me know how the refrigeration thing works for you.) If you find the dough too sticky to work with, cover the bowl with foil/plastic wrap/a large plate and pop it in the fridge for 10-20 minutes.

Next, use a spoon to scoop up a ping-pong ball sized or slightly smaller bit of dough, and roll it gently between your palms to form a ball. Drop it on a cookie sheet (greased or covered with parchment paper if you like) and flatten it out a little so that it'll cook more evenly. Leaving about 3 inches between cookies, fill your cookie sheet and bake for 8-12 minutes, depending on the size of the cookies and whether the dough has been chilled. (You're looking for the cookies to puff up and then deflate a bit -- an undone cookie will yield easily if you gently poke the top of it, and leave a sort of darkened, bruised-looking indentation, and will feel very soft. Gently poking the top of a done cookie will offer slight, springy resistance, and won't leave an indentation. Erm, relatedly, please use caution if you're going to go reaching into ovens to poke at cookies. Honestly, erring on the side of underdone is okay. They'll continue to cook a bit once they're out of the oven anyway.)

Once they're out, let the cookies cool for a couple minutes on the baking sheet, then remove them to a wire rack to finish cooling enough to shove in your mouth serve.

If you're going to put another sheet of cookies in to bake immediately, wipe down your cookie sheet with a clean, damp cloth or paper towel first (this gets the crud off the sheet and also cools it down enough so that it won't par-bake the new round of dough before it even hits the oven).

If you'd like, you could freeze the dough for baking later -- I just roll the dough into cookie-sized balls and wrap them in plastic wrap so that none of them are touching, then stick the whole caboodle into a ziplock bag or Tupperware and shove it in the freezer. Alternately, if you have the space in your freezer, you could place the dough balls on a baking sheet and let them harden in the freezer for an hour or so, after which they shouldn't stick to each other and could be placed directly into a ziplock bag/Tupperware. They'll keep in there for at least a week. Just remember to either let them defrost in the fridge for a few hours before baking, or to adjust your baking time (maybe 12-18 minutes) if you're doing them straight from the freezer.

Sunday, August 9, 2009

recipe: orange-chocolate-raspberry yogurt cake

The whole thing where the word "cake" doubles as a synonym for "simple" makes me feel like a complete lamer sometimes. 'Cause folks, sometimes cake is hard. There are electric beaters involved, and patience and delicacy are as necessary as those eggs that oh-hell-you-didn't-beat-enough, and after it comes out of the oven people expect you to do something fancy with it. I secretly despise complicated recipes and making things pretty -- my favorite desserts are hearthy, homey things that look a mess and taste ethereal, like the music nibblins of the spheres.

This loaf cake comes together in two bowls, no electric gadgets necessary, and the "decoration" involves stirring and then pouring. And having leftovers means that you don't have to fix breakfast.

Orange-Chocolate-Raspberry [aka Anything] Yogurt Cake
Adapted from smitten kitchen, who adapted it loosely from Ina Garten

INGREDIENTS

Cake
1 1/2 cups all-purpose flour
2 teaspoons baking powder
1/2 teaspoon salt (coarse/kosher/sea salt always preferred)

1 c. plain yogurt (I used nonfat, lowfat might be better)
3/4 c. white sugar
3 eggs (extra-large preferred)
2 teaspoons grated orange zest (~1 orange)
1/2 teaspoon vanilla extract
1/3 cup vegetable oil

1/2 c. fresh raspberries
1 tbsp additional flour
1 c. chocolate chips

Glaze
1 orange-worth of fresh-squeezed juice (~1/3 c.)
1 tbsp sugar

METHOD

Grease and flour a loaf pan (8 1/2 by 4 1/4 by 2 1/2-inch if you've got it) -- yes even if it's nonstick. (The way I do this is: Take stick of butter. Rub across bottom and sides of pan to coat lightly. Put down stick of butter. Use fingers to spread the applied butter evenly around the surfaces and into the corners. Wipe off hands. Get a good couple pinches of flour and sprinkle them around the pan, probably working over the sink. Tap & turn the pan to coat the butter evenly with the flour, and then tip extra flour out of the pan. Then: TADA, your loaf will release, well, like buttah.)

Get your oven preheating to 350°F!

Measure your flour, baking powder, and salt into a bowl and whisk to combine. You could also sift them together if you were feeling less lazy than me.

In a second, larger bowl, whisk your yogurt, sugar, eggs, orange zest, vanilla, and oil together until smooth.

Whisk the dry ingredients into the wet ingredients in maybe 4 small batches. Once smooth, stir in the chocolate chips.

Toss the raspberries with the extra tablespoon of flour (so they'll bleed less!) and then gently-gently fold them into the batter. Pour the batter into the prepared pan and bake for ~50 minutes... this cake will dry out fairly easily, especially if you've used nonfat yogurt, and it won't brown very much, so start checking at ~45 minutes and probably don't let it go longer than 60. A toothpick or skewer inserted into the middle should come out pretty clean when it's done, but if you bake by sight like I do, you're looking for a light golden color, nothing deeper.

Meanwhile, just barely simmer the orange juice and extra tablespoon of sugar in the smallest saucepan you ever did own, until the sugar is dissolved and the mixture is clear. Set aside.

Let the cake cool off for 10 minutes after it comes out of the oven, and then turn it out onto a cooling rack. If you want to make your cleanup process easier, set the rack on top of a cutting board, baking sheet, or strip of wax paper/tin foil/plastic wrap. Slowly spoon the warm glaze over the top of the cake -- it'll be runny, so a gentle drizzle is about the right speed. (If you're feeling industrious, you can use a toothpick/skewer to poke a few dozen holes in the top of the cake to give the glaze places to go.) You could alternatively reserve the glaze and drizzle it over individual servings of cake just before passing them around.

I think this cake is terrific warm, but it's just as nice once it's cool, and possibly even better once it's been chilled. Which you should always do with baked goods that contain fruit if you want to store them for more than a day.

You could put just about anything into this cake... next time, I'm thinking I'll try chopped strawberries instead of the chocolate chips & raspberries, and lime zest & juice instead of orange. But yes. Just use 1.5 cups of Delicious Stuff, and some kind of citrus zest & juice. And up to an extra 1/4 cup of sugar if your Delicious Stuff is a sorta tart fruit. Tell me what you do and how it came out! And if you take pictures, send them to me and I'll link and/or post them.

Thursday, May 21, 2009

recipe: best fudgy brownies yet

My Quest for the Ultimate Brownie Recipe will be a lifelong sort of thing, I suspect. I suppose it only makes sense that in a recipe so simple (really, you could make them in a single bowl with just butter, flour, sugar, chocolate, and eggs), small changes make such a huge difference. I subscribe to the School of Brownies dictating that a Good brownie is rich, dense, and a bit chewy -- something between fudgy and cakey. I've tried a few different recipes lately (I've been going through a breakup, okay?) and here's my favorite so far. They could be a bit chewier. I'm working on it.

Let me know if you try this recipe with any variations! Edible chemistry is fun.

Oops We Ate The Whole Pan Brownies
Adapted from Joy of Baking, which loves to teach me things

INGREDIENTS

1 stick butter
4 oz. tasty chocolate (I used part of a 70% cacoa bar and some bittersweet chips)

1 c. sugar (I used 3/4 c. white and 1/4 c. lightly packed dark brown sugar)
3 tbsp Dutch-process cocoa powder
1 tsp vanilla extract (or 1/2 of a vanilla bean's scrapings)
Pinch salt (up to 1/2 tsp if you like salty + chocolate)

3/4 c. flour (I used 1/2 c. all-purpose and 1/4 c. fine-ground almond meal)
1/2 tsp baking powder

3 eggs (I used 2 whole + 1 yolk)

METHOD

Set up a ghettofab double-boiler for yourself: Put a couple inches of water in a pot, and then place a second pot or a skillet on top of the first so that it's not touching the water (the top pot should ideally be just a tad too big to fit inside the bottom pot, but not so big that it eclipses the rim of the bottom pot, savvy?). On a low-to-medium heat setting, this will be a safe way to show melty love to your delicate chocolate.

Cut/break your butter and chocolate into chunks and add them to the skillet. You just want them to melt, not simmer. Stir occasionally.

While they're melting, measure your flour (or flours, or flour/nut meal combination) and baking powder out into a largish bowl and whisk them to get everything incorporated evenly.

Now's also a good time to preheat your oven to 350 and butter & flour a 9x9 pan (mine's shiny nonstick metal, which cooks things faster than nonshiny metal, silicone, and glass pans. You could also use an 8x8 if that's what you've got).

Once the butter & chocolate have melted into a delicious, calorically terrifying goop, you can take your ghetto-boiler off the heat. The residual heat should be plenty for mixing the rest of the ingredients… so add the cocoa powder, sugar(s), vanilla, and salt to the skillet, and stir to incorporate. (At no point during this recipe should you attempt to beat/whip/whisk the wet ingredients! Beating incorporates air, which leads to a cakier brownie. Stir firmly but don't crazy go nuts.)

Crack your eggs into a small bowl and stir to break up the yolks. (Egg whites will make your brownies chewier/cakier, and yolks will make them richer/fudgier. You should crack 3 eggs for this recipe, but use whatever white/yolk ratio you're comfortable experimenting with.) Take a tablespoon or so of the melty chocolate mix and stir it into the eggs to temper them, then stir the eggs into the chocolate mix until everything's completely incorporated.

Pour the chocolate mix into your flour mix and stir to incorporate. Batter will be thick and very sticky. Spread evenly into your prepared pan and bake for ~15 minutes if you've used a 9x9 (I'd guess at giving an 8x8 pan 20-25 minutes). Supposedly, a wooden toothpick/skewer inserted near the center of the pan will come out with a few bits stuck to it but not covered in goop when the brownies are done, but I never have any on hand so I couldn't tell you for sure. Other ways to tell that the brownies are done: The top is crackly and separating from the dough below it, the edges are just starting to pull away from the sides of the pan (definitely take the pan out when this happens), and/or they smell too good to leave in anymore. They'll continue cooking from residual heat a good while after they're out of the oven, so I'd error on the side of underbaked, personally. But I'm not particularly scared of/squicked by undercooked baked goods.

You should set the pan on a rack/towel/other room temp, heat-safe surface and let the brownies cool completely before cutting and eating them -- I know, I know, it's asking a lot. But the texture will improve and the flavor will intensify as they settle.


Any questions? Ask! I can't bake for all of you, so I want to help you bake for yourselves.

Tuesday, February 10, 2009

review: Vosges' Caramel Marshmallows

Vosges Haut Chocolate's Caramel Marshmallows are so orgasmically good that it took me five tries to type "marshmallows" just now.

Okay. Center. Concentrate. Down, girl.

First off, these things are huge. 1.5-inch square by 1-inch deep huge. They come only 9 to a box, but I cannot imagine attempting to eat more than one in a go, and probably not more than one per day, so honestly that's okay. (This is Vosges' photo, not mine.)

I take a messy first bite, and the salt and sweet of the caramel hits me first, followed by the vanilla of the marshmallow and then the richness of the chocolate, and then more salt from the toffee and roasted earthiness from the nuts. It tastes like an ice cream sundae -- so much so that my mouth misses the cold bite of ice cream while I'm eating it. The components are each fine unto themselves -- the chocolate deep & slightly bitter, the toffee light & crunchy, the marshmallow and caramel each sweet but not cloying -- but tasted together they just make more sense than they do apart. Candy logic!

The chocolate coating breaks around the edges and bits of nut and toffee go tumbling as I take each bite, but for the most part it holds itself together surprisingly well for something so precarious. The texture is just the slightest bit odd -- the marshmallow is firmish and a little chewy, and the caramel is the gooier, meltier of the pair, which isn't what I was expecting -- I think I'd like it better if the marshmallow were textured more like fluff.

But it's lovely nonetheless, a golden ratio of sweet to salty and rich to bright. It's from Vosges' comfort foods line, and it's exactly comfort: it's summer vacation, it's fairgrounds, it's that long-lost recipe of your grandmother's. This would be a perfect mid-winter gift for some sweet person who could use a bit of warmth (and a sugar rush).

They come shrink-wrapped for freshness (the packaging says to consume them within 2 weeks), and in a sturdy, lavender-colored box that you could probably find a second life for. As I said, they come only 9 to a box -- and each box is $27.00, and they ship via UPS (aka not cheaply). So they're maybe not for people on strict budgets.

Someone more thriftily minded who wanted something Haut might order a couple 4-piece party-favor boxes of truffles (look for the "Asian" boxes) or caramels. Price breakdown on these mini boxes is $2.38/piece, as opposed to the $3.00/piece you'd pay for the privilege of receiving a larger & fancier box. While you can't sample their whole catalogue this way, you can try 12 of their most popular truffles and 9 different kinds of caramels, so it's not a bad deal. Also worthwhile are their full-size Exotic Candy Bars, which cost $2.50/oz for the non-organic bars. I, the dark chocolate fiend, most recommend their milk chocolate ones, specifically Gianduja and Wolloomooloo.

Overall, I find these schmancy chocolate-covered caramel marshmallows worth the monetary and caloric splurge! Especially as a once-in-awhile treat to be shared with friends and other loved ones.

p.s. -- You'll pay upwards of 25 American dollars for the opportunity, but Vosges can get some of these suckers to you by Valentine's Day if you order with 2-day shipping before Wednesday, February 11th, 1:00pm Central time. They ship from Chicago, so Ground MIGHT also work too if you're in the East/Midwest, but no promises.

Tuesday, January 27, 2009

recipe: clementine cake

Over my blissfully long weekend, my roommate and I had a few friends over for analog games and I decided to try out the clementine cake recipe that smitten kitchen posted a couple weeks ago. It's the sort of recipe that's irresistible to me… whole citrus! Ground almonds! Addition to my gluten-free repertoire! Whole citrus!

It didn't come out edible in time for said friends to try it -- the suggested cooking time was pretty wide open, and I was using silicone bakeware for the first time ever, so it needed a bunch longer in the oven than I thought it would -- but it came out pretty well eventually!

It's dairy-free and gluten-free, and tastes really sharply of citrus, and is extra rad with chocolate ganache (which I've never tried to make dairy-free, but I'm certain is possible with nondairy cream and butter substitutes, as most high-cocoa chocolate contains no milk solids). Bitter is one of my favorite flavors (and emotions!), and when you do this cake +ganache, it has my new favorite trifecta O' bitter: citrus, almonds, and chocolate. The texture is really fluffy-light and creamy with a bit of grit from the almonds -- something more like a flourless torte or a cheesecake than a cakey cake texture.


Clementine Cake
Adapted from smitten kitchen, who adapted it from Nigella Lawson

INGREDIENTS

5 whole clementines (rinsed and stems removed, but that's it)
5 eggs
1 heaping teaspoon baking powder
2 1/3 cups almond meal or ground blanched almonds (250 grams, or 0.55 lb)
1 c. plus 2 tbsp white sugar (225 grams, or 0.5 lb)
1/4 tsp salt
1 tsp rum, brandy, or bourbon (optional)

Optional ganache:
4 oz. semisweet chocolate (113 grams)
2 oz. heavy cream or coconut milk (4 tbsp, or 57 grams)


METHOD

Place your clementines in a pot, cover with water (enough so that they're floating an inch or so off the bottom), and heat to a boil. Turn the heat down to a steady, strong simmer and cook for 2 hours, stirring occasionally. (This will remove most of the bitterness from the fruit.) I used a lid with a steam escape, and liked the result… I never had to replenish the liquid, and the fruit unbitterified fairly well. If you don't have a steam escape lid, just crack the lid a bit? After the 2 hours, drain the clementines and allow to cool.

Now is a good time to measure out the rest of your ingredients.

Halve the clementines and remove any seeds, then blend (or chop) very fine. I opted for pretty much complete liquification in my blender.

Now is a good time to preheat your oven to 375, and butter a 9" round cake pan. If you're using a springform, line the buttered bottom with parchment paper and butter the paper. (For the strictly non-dairy cake, other methods of greasing would work fine.)

Beat your eggs (you want a good froth, but not stiff peaks -- ~3 minutes with an electric beater, or ~8 with a whisk). Whisk together the sugar, ground almonds, and baking powder, then gently mix that plus the clementine gunk into the eggs -- you want to preserve some of the foaminess.

Pour into your prepared pan, and bake for 35+ minutes or until a wooden skewer comes out clean. If you notice a lot of browning on top but the insides are still sticky around 30 minutes, cover with tinfoil and continue baking. (Using a silicone pan, set on a baking sheet for stability, I probably could've gone all the way to 50 minutes before it was done. Using a metal springform, it was ready around 37 minutes.) Allow to cool as completely as possible before removing from pan.


MAKIN' IT FANCY

To make ganache the real way, set your chocolate in a double-boiler over low heat. Separately, heat cream to nearly boiling (ie, steaming, and bubbling just a bit), and then pour hot cream over chocolate and stir until melted and smooth.

To make ganache the easy way, dump everything in a small bowl and microwave for maybe 15 seconds, and then stir until melted and smooth. (It won't temper correctly with the easy way, so it won't have quite the same texture or shine, but it'll still be yummy.) While the ganache is warm, pour evenly over the cake and spread with a spatula to coat the top and sides. Cover and refrigerate to set the chocolate.


Tuesday, January 13, 2009

review: Dolfin Chocolat: Milk, Hot Masala from India

One of the best things about being a grown-up is that you can eat chocolate recklessly, like a 4-year-old who's gotten into the pantry, whenever you want. I usually keep a few bits & bars in stock in case of immaturity emergency -- anything from Vosges to Choxie. I've been depleating my supplies recently, so the other night while I was at the grocery store I picked up a couple of minibars by Dolfin, a Belgian company that I'd never tried anything from, including their Milk, Hot Masala from India bar.

Upon opening the bar, it smells like chocolate and then SPICE and then chocolate again, and then spice. I suspect that they're not kidding about the "Hot". My little 30g/1.058oz bar has 4 sections, so I break one off -- it's a milk chocolate but it's got a good snap to it, if not much temper shine.

Tasting a piece, the spice hits my palate first -- this tastes like an Indian restaurant smells, an almost floral bouquet of cardamom, cinnamon, and pepper. The flavor of the chocolate only comes to the front as it begins to melt -- but it's so smooth, like a sip of creamy cocoa. Bars like this are why I'm getting into milk chocolate again after years of being a fiend for dark. It's a really big, full-mouth flavor, surprisingly not hot for as spicy as it smells, and so rich that I'm perfectly fine with eating only one quarter of the tiny bar at a go.

My only (and slight) qualms with the bar: It's got a very very slight grit to it due to the lovely spice content, so once in awhile I find myself chewing on a bit of spice -- but it's a texture thing, not a flavor thing, and overall the quality of the chocolate is so nice that I can forgive it. Also it's got a bit of an odd aftertaste to it from the lingering spices -- I think the cardamom's going to stay with me awhile. A drink of water mostly clears my palate.

If you like masala spices, and/or cardamom in general, you need to find a bar of this pretty much immediately. It's brilliant, feels indulgent, and the minibar is sized for preventing too much of a caloric splurge (~41 Calories/7.5g quarter section, or ~164 Calories/bar… for contrast, a Hershey's Kiss is ~26 Calories/4.6g kiss, and I have to eat 3 or 4 of those to feel sated). I give it 9.2 nom nom noms out of 10! Though I found mine at my local Whole Foods, Google lists several online retailers who carry the Dolfin line. I bought mine, at a discount, for $1.69 (normally it'd be $2.20 or so at my WF).

I'd definitely try other bars from this confectioner -- and that's a good thing, 'cause I've got a bar of their Dark with Pink Peppercorns that's next in line.

Wednesday, October 1, 2008

recipe: Double-Chocolate Bacon Cookies

I like baking; it's edible chemistry. I can do chemistry. Cooking terrifies me 'cause it's all unregimented in ways that I never learned how to troubleshoot, but I find baking easy -- medatative, even. (Unless things are going badly and I can't figure out why, in which case I have occasionally tried to behead innocent bystanders with pie plates.) And I like feeding people, especially with things they've maybe never tried before or wouldn't bother making for themselves. So what exactly does a grammar monkey bake for a triple-bachelor birthday/house party/post-Piratepalooza party/all-around sin fest?

Double-Chocolate Bacon Cookies
(Makes 24 cookies)

INGREDIENTS

1/2 cup (1 stick) unsalted butter, softened
2/3 cup white sugar
1/3 cup brown sugar
1 egg, room temperature
1 teaspoon vanilla extract (or 1/2 a vanilla pod, scraped)
Dash of scotch/whisky, if you happen to have some (~1 tablespoon)

3/4 cup all-purpose flour
1/3 cup cocoa powder
1/8 teaspoon salt
1/4 teaspoon baking soda [NOTE: If you're using Dutch-process (aka pre-alkalized) cocoa powder, you should use baking POWDER instead. Otherwise you'll end up with oven-baked pancakes.]

1 cup semisweet chocolate chips
6 strips of smoky bacon (a little less than 1 pound uncooked; it should be ~1/2 c. once chopped)


METHOD

1) Set out your butter and egg to allow them to approach room temperature.

2) Cook off the bacon -- err on the side of extra-crispy, but don't burn it all to hell. Drain on paper towels and allow to cool completely, then run it through a food processor (or y'know a knife) until it's basically largish bacon bits. Set the bits on a paper towel to drain (again).

3) Preheat oven to 350 degrees F (175 degrees C).

4) In large bowl, beat the butter and sugar until light and fluffy -- a couple minutes on medium with an electric mixer should do it.

5) Beat in the eggs, vanilla, and any booze you're using until well incorporated -- another minute or so with an electric mixer on medium.

6) Sift or whisk together the dry ingredients (flour, cocoa, baking soda, and salt), and then stir the dry mixture into the wet mixture until the dough is smooth -- it'll be a bit sticky.

7) Stir the chocolate chips and bacon bits into the dough.

8) Drop by the rounded teaspoonful onto ungreased cookie sheets, and flatten slightly with your fingers.

9) Bake for 8 to 10 minutes -- the cookies should be crisp around the edges but still soft in the middle. Allow to cool slightly on the sheet before transferring to wire racks to cool completely.


NOTES

The amount of bacon you're gonna wanna use will depend on the thickness of slices and how much you wanna freak people out. I'd recommend buying a thicker-cut, higher quality bacon (I like Wright's) so that the bacon flavor really comes through without these feeling like meatcookies.

If the dough is too wet/runny/sticky to easily get onto the baking sheet after step 6, you can add maybe a tablespoon of flour and/or cover the bowl and set it in the fridge for ~10 minutes. If you wanted to, you could leave the dough in the fridge for a couple hours and come back later for the baking part.

You should probably warn people a lot that there's bacon in them there cookies -- I made a sign involving cartoon bacon holding hands with cartoon chocolate.

Many thanks to Kathy from AllRecipes.com for the chocolate cookie recipe I started with, to muffin of NeverBashfulWithButter.com for bravely blazing the bacon cookie path before me, to Vosges for providing me with my original choco-bacony inspiration, to Mike, Geoff, and Joe for being born, and to all the nice people who didn't punch me in the gut when I offered them a cookie with meat in it.