Showing posts with label fall. Show all posts

Thursday, November 25, 2010

Thanksgiving can also have tricks and treats

Happy Thanksgiving, American compatriots! If you're looking for something to do with that extra bag of cranberries you accidentally bought, I recommend sugaring them for a pretty table setting/delicious cranberry candy 2-hit combo.

sugared cranberries on a table set for Thanksgiving dinner

My contribution to the dessert table this year will hypothetically be this Pear Butterscotch Pie from Epicurious. "Hypothetically" because it's in the oven right now, and it's looking a lot more like one of Mrs. Lovett's pies than the thing in Gourmet's picture, and we're out of tin foil so I can't tent the edges of the crust to prevent overbrowning. [Though really, if I manage to not set it on fire I'll be doing better than I have with Thanksgiving dishes in the past. (I apparently only bust out the en fuego accidental for special holiday occasions. It's the best hostess gift ever? It's thematically warm & stressful?)] Will let you know how it turns out!


In the meanwhile, a non-caloric holiday treat: a new episode of Consumerism WOW by Adam & me! Adam picked the things we talked about this month, including but not limited to this shirt design:

Thing #5


a happy exclamation point
Lauren: Your dour demeanor so frequently belies your gleeful mood that you want to reassure people that on the inside, you are super excited about everything. OR you want to trick people into thinking that you’re super excited about everything so they’ll be off their guard for the unequivocal pants-kicking that you’re about to deliver them.

Adam: Well now that you explained about the pants-kicking my success rate at fooling people is going right in the toilet! And hey, I’m not dour, Lauren! I am inscrutably magi-cranky, thank you very much.


Visit Adam's blog to discover his nefarious consumer desires and learn some Science! He sure learned me about rainbows.

Friday, November 12, 2010

recipe: Not Quite Mom's German Apple Cake

Halloween may have super-sneak-ninja attacked me this year, but I had Fall all figured out. The day that the scent of cinnamon brooms battered me at my first step into my local grocery store, I bought some Granny Smith apples, went home, and apropos of no greater occasion than the season made this version of my mom's German apple cake.

cake topped with chopped apples, with a wedge cut out

If you wanted to be proper about it, you'd use all white flour and all white sugar in this cake to achieve the sweetest richness, and you'd slice the apples thin-thin-thin for galette-style decoration and chewy caramelization. My modifications yield an earthier, more everyday cake for those of us who don't own a mandolin and have come to comfortable terms with the fact that we'll wind up eating leftover cake for breakfast, and will feel better about it if there's a bit of whole wheat flour involved.

Dense and buttery with a bright, tart kick from the apples and a warming touch of cinnamon, this cake is Fall comfort. Unmodify it for a fancy party treat, or try my relaxed version for a laid-back, party-optional sort of thing.


Not Quite Mom's German Apple Cake
Serves 8-12 people.


INGREDIENTS

3 granny smith apples
1 1/2 tsp ground cinnamon
1/4 cup sugar
half a lemon, de-seeded as best as possible

2/3 cup all-purpose flour
1/3 cup whole wheat flour
1 tsp baking powder
1/2 tsp salt

2/3 cup white granulated sugar
1/3 cup brown sugar
1/2 cup unsalted butter, softened
2 eggs
1 tsp vanilla extract (or 1/2 vanilla bean, scraped)
2 tbsp bourbon, if you've got it


METHOD

Peel & core your apples, slice them into wedges, and chop the wedges into roughly equal-sized chunks. As you go, place the resulting applebits in a medium bowl, tossing them with a squeeze of lemon juice to prevent browning each time you add a batch. Once all 3 apples are chopped, add the cinnamon & sugar and toss/stir/muss about with your hands to coat the apples. Set aside to macerate (i.e., soak & soften) while you prepare:

A pan! V. important to the cake-making process. I used a 9-inch springform for the cake in the photo, but a larger round or square should work so long as you shorten the baking time. Butter and flour your pan of choice and set aside.

Set your oven to 350 degrees F.

Measure your dry ingredients out into a medium bowl and whisk gently to combine.

In a larger bowl, with an electric mixer on medium speed, cream together your butter and sugar for ~3 minutes or until the mixture has lightened in color and texture (indicating that cake-buoying air has gotten into it). Add the eggs, vanilla, and optional bourbon and beat for another 2 minutes to combine thoroughly.

Add your dry ingredients to you wet ingredients and stir with a spoon/spatula/other nonelectric device to combine. The batter should be shiny and smooth (keep stirring if it's not). Pour it into your prepared pan and wiggle the pan to distribute evenly.

Drain most of the liquid from your apples (they can be wet but shouldn't be dripping) and scatter the pieces across the top of the batter, pressing them in just slightly.

Pop the pan in the oven and bake for 60 minutes. Well, check it around 50 minutes. You're looking for the sides of the cake to be deep golden and pulling away from the pan, for the liquid between the apples to be sizzling merrily, and for little bits of batter to be poking up between the pieces of fruit.

Remove from the oven and let cool in the pan until said pan is handleable, then either remove it from the springform, carefully flip it out of your non-springform pan (using a plate to flip with instead of a wire rack), or simply slice and serve the cake from where it is. Seal tightly and refrigerate any leftovers, which should keep for a week.


*If you leave it in the oven too long, no worries: you can abuse this cake and it'll still come out okay. As long as it's not actually charred, just stick it in the fridge in a tightly covered container overnight and it'll be lovely and moist the next day. When you eat it for breakfast. Because that's what responsible adults who have used whole wheat flour do.


[I previously posted an iteration of this recipe done with pears instead of apples, which is lovely if you have heathens friends who dislike cooked apples.]

Thursday, November 4, 2010

feliz el too-busy-to-update mes!

Faithful readers! Fear not, for I have not abandoned you (entirely)! The past few weeks, I've been quite busy traveling to Boston again, doing that aforementioned job-what-makes-me-work thing, and making Halloween happen (I mean, not for everybody, but for some 80 people, anyway).

While in Bostontown I ate here and here, and had a tasty cocktail here. More about that later on when I have fewer wines and encroaching bedtimes the wherewithal to serve up proper foodpr0n.

a dog that is really excited about getting petHere in Atlanta I've been living the questionably glamorous life of a Social Media Nomad, which comes with an 80s-Saturday-morning-cartoon-style theme song, frequent visits to coffee shops with patient baristas & free wi-fi, and a really psyched dog (see illust., right). One of these days I might post a whole entry about all the coffee shops in town, and about how I'm spending too much money on Jeni's Ice Creams at Star Provisions and on sandwiches with Vietnamese-style pickles at Bocado now that I'm occasionally hanging out around the West Side. Until then, you can count on me to be fading in and out of shadows, a loaded MacBook on my back.

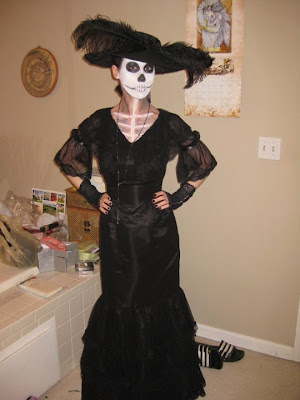
Somewhere among all that dull "necessary" stuff, Halloween happened! Through careful planning and wonderful friends, I managed to make this calavera Catrina costume go (please excuse the mess):

la calavera Catrina costume with an Edwardian-style dress

A seamstress friend, Jennifer, made the Edwardianish dress for me -- and if anyone else out there is looking to commission a garment (not necessarily Edwardianish), contact me and I'll get you in touch with her 'cause she's fabulous. The crucifix was cobbled together with bits from the jewelry-supply sale rack at Michael's, the makeup is Ben Nye cake and grease pencil, the gloves are Leg Avenue fingerless things from Sock Dreams, and the hat is all the spray paint, ostrich feathers, 50-cent ribbon, and hot glue that you can apply to a straw hat while in a mild state of hat-panic on the afternoon of your Halloween party. Both the makeup & hat were completed with the gracious assistance of a certain dreamthrum, who I guess I like pretty well.


So! What've you been up to?

Wednesday, December 2, 2009

recipe: drunken-raisin oatmeal cookies with pecans and tangerine

I'm a food blog junkie, infatuated with foodie recipe sites, and a sucker for slick, high-production-value cookbooks. And I'm here today to tell you: Sometimes the recipe on the back of the brand-name lid really does work best. For example, my favorite pumpkin pie is the kind you make with a can of Libby and the recipe that's printed on the label. (The first year that my family nouveau & I hosted our See We Are Totally Grownups Thanksgiving, we slaughtered a pumpkin and made the pie from scratch. It wasn't as good.) Same goes for oatmeal cookies -- honestly, the Quaker Oats kids know what they're talking about. They've made some cookies in their time. Trust in the label. It wants you to eat delicious cookies.

....Okay, confession: I don't entirely trust in the label. 'Cause, see, the Internet told me that parbaking the pie crust will prevent sogginess and that simmering the pumpkin and cream together will make a richer filling, and the Internet never semi-rarely steers me wrong. I can never just follow a recipe. This is possibly why I started a food-related blog.

In the case of oatmeal cookies, I mostly just add a few little touches for maximum deliciousity. The base recipe creates soft, chewy, comforting oatmeal cookies. With a few little additions, I wind up with something that tastes like home and warm and the holidays: pecans for a buttery crunch, whole wheat flour for nutty richness, cloves and tangerine zest for tastes-like-Christmas, and whiskey for smokiness & extra moisture [and also 'cause dude, most things about the holidays are better when you (or, y'know, your raisins) are a little tipsy].


Drunken-Raisin [Vanishing] Oatmeal Cookies, with Pecans and Tangerine
Adapted from the inside of the Quaker Oats lid. Makes ~3 dozen cookies.


INGREDIENTS

1/2 cup raisins (dried figs would also be awesome, just chop them raisin-sized)
1/4 cup whiskey (or bourbon -- you want something sweet rather than peaty, I used Jack Daniels)

1/2 cup all-purpose flour
1/4 cup whole wheat flour
1/2 tsp baking soda
1/2 tsp ground cinnamon
1/8 tsp ground cloves
1 tangerine (or orange, or clementine, for 1 tsp of zest)

1/2 cup packed brown sugar (light or dark is fine, I like dark)
1/4 cup granulated white sugar (minus a tablespoon if you like less sweet desserts)
1 stick unsalted butter (we're gonna soften it)

1 egg
1 tsp vanilla extract

1 1/2 cups whole oats (regular or quick-cooking)
1/3 cup pecans (we're gonna chop them small & toast them)


METHOD

At least an hour before you start working, measure out your raisins into a ramekin, small bowl, or coffee mug. Add the whiskey and stir. Set aside, and stir whenever it occurs to you that you haven't in awhile. (You could do this the night before, even, if you have way more foresight than I do.) Don't worry, all the alcohol will bake off. No one will get tipsy from the finished cookies.

When the raisins have soaked up some of the whiskey, you're ready to start working. Set out your butter and egg to allow them to warm up a bit.

Chop your pecans to pea-sized-or-smaller chunks, and toast them until fragrant and warm-golden colored. That'll be ~2 minutes in a toaster oven or in a pan on medium heat on the stovetop, ~10 minutes in an oven that's just been turned on and is heating up to 350 (which is what the cookies will bake at), or ~5 minutes in a hot oven. Watch them carefully. If they burn/blacken, start over with fresh pecans. Set aside.

Measure out your dry ingredients (flours, baking soda, cinnamon, and clove) into a medium bowl and whisk to combine. Zest your orange-colored citrus of choice, and if the pieces are more strip-like than granular, chop them fine (a teaspoon is approximately what you get from one tangerine or clementine, or ~1/2 of an orange, if you're not being extremely industrious about zesting). Add the zest to the dry stuff and whisk again to combine.

If you haven't heated up your oven yet, now would be a good time to get that going towards 350.

Measure your sugars into a separate, larger bowl and add your softened butter in chunks. Cream them together using an electric beater on medium for 3 minutes, then add your egg and vanilla. Use a spoon to strain 2 tablespoons of whiskey off of the raisins, and add that to the wet mixture as well. Use that electric beater on medium again for 1 minute to combine.

Add your dry ingredients to the wet ones, and stir by hand to combine. Drain any remaining whiskey off your raisins, and add the raisins to the bowl. Also add the toasted pecan bits and the oats. Stir, again by hand, to combine.

Drop by rounded tablespoon (ping-pong ball sized bits) onto a cookie sheet and bake for 10 to 12 minutes. They'll look a little shiny and underdone in the very middle of their tops, but they'll continue cooking a bit after they come out, so that's okay. Cool for 10 minutes on the pan, then carefully remove them to a wire rack to cool completely. They'll be crumbly while they're still warm, and chewier once they're cool. I'm a chewy-texture fan, so I'd recommend waiting.

If you don't need that many cookies right now, you could refrigerate the dough for an hour or so until it's solid enough to work with, and then mold rounded tablespoons of dough into balls, wrap them in plastic wrap, and freeze in a plastic bag or container for up to a month. (Just let them defrost in the fridge for a few hours before baking, and use the full 12 minutes of baking time to compensate for the dough being chilly going in.)

Store the cookies in an airtight container, and they should last a week. Freshness-wise, anyway. They don't call them "vanishing" for nuthin.


OH HAY, A TIP

If, like I did when I made these, you find yourself without brown sugar but with both white sugar and molasses, you can haz a substitute. White sugar is just brown sugar with the molasses removed. So, to substitute for a half cup of dark brown sugar, use a half cup of white sugar plus 2 to 3 teaspoons of molasses. (I say "2 to 3" because honestly, measuring molasses is an imprecise science. Just get about that much in the mixing bowl, and don't worry about it.)

Tuesday, December 1, 2009

recipe: sugared cranberries

Last winter I went through a phase where playing with melted sugar seemed like a really excellent idea, and through a simultaneous obsession with cranberries. Of course this happened eventually:

sugared cranberries
Sugared cranberries. Most recipes I've seen call for maceration overnight, but I prefer my method of gentle simmering -- it jellifies the inside of the cranberries without sweetening them very much, and once you apply the sugar crystal coating, each berry becomes an individual bite of cranberry sauce: a burst of tart, thick jelly contained by the crisp crunch of sugar shell. And they look gorgeous and festive as a plate garnish or table dressing with a warm & wintery holiday meal. Many thanks to Maria @ MommyMelee for the photo evidence.


Sugared Cranberries

INGREDIENTS

1/3 cup granulated white sugar (for coating)

1/4 cup granulated white sugar (for syrup)
2 tbsp water
1 cup fresh cranberries

1/4 cup additional sugar (for syrup)


METHOD

Set out a layer of parchment paper (or a plastic/silicone cutting board) on a flat work surface. Pour the 1/3 cup of sugar for coating into a medium (like, can-of-soup-sized) bowl, and set it by the paper/board.

Rinse the cranberries, but don't worry about drying them. In a 2-quart saucepan (i.e., smallish, but large enough to hold all of the cranberries in a single layer), stir together the water and 1/4 cup of sugar, and place over very low heat. Like, heat setting 1 or 2 out of 10. You'll want it to just simmer, but never reach a full boil. Stir the sugar occasionally until it's dissolved and just beginning to bubble.

Add the cranberries to the melted sugar, and stir gently to coat. Some (or even most) of the cranberries will split a seam in their skin to let steam out, but so long as they're not starting to gush jelly out into the pan, they're not too hot. If any start bursting completely open, take the pan off the heat for a moment and turn the temperature down.

Cook for about 3 minutes, stirring gently and frequently to keep the cranberries coated with the syrup. When the liquid in the pan begins turning pink, add the extra quarter cup of sugar. Continue stirring gently for another 3 minutes or so. You're looking for all of the sugar to be dissolved and the cranberries to look like they can't take much more heat without bursting.

Turn off the heat, but leave the pot on the warm burner to prevent the syrup from solidifying too much while you're working. With a slotted spoon, fish a scoop of cranberries (<10 or so) out of the pan and wiggle it to drain off some of the syrup. Add the cranberries to the bowl of sugar, and shimmy the sugar around in the bowl to coat them. If any of the cranberries are sticking together, poke them apart with a finger or clean spoon (carefully -- hot sugar can be very hot). Once they're coated with sugar crystals, gently pick the cranberries out (they should be cool enough to touch if you're quick) and place them on the parchment paper/board to cool, dry, and harden.

Coat the remainder of the cranberries in sugar, a scoop at a time. If towards the end of the batch you find the sugar crystals clumping instead of coating the cranberries evenly, just pick out the clumps of syrup and add a couple tablespoons of fresh sugar to the bowl. The sugared cranberries can be eaten/used as garnish as soon as they're cool enough -- maybe after they've been out of the pot for 10 minutes -- but if you want them to last for a day or two, allow them to dry for at least an hour on the sheet.

You can proceed this way through an entire bag of cranberries, using fresh sugar each time -- a 16 oz bag contains about 3 cups, or 3 batches. You want to keep the cranberries in a single layer in the pot, though, so that they cook evenly and thoroughly -- don't be tempted to cook a double or triple batch all at once.

It's best to store the sugared cranberries in an open container in a cool, dry place that's out of the sunlight, which may melt them. Do not store them in the fridge -- the moisture will make them melt for sure. You can seal them in a plastic baggie or container if you wish -- just put a layer of parchment between the cranberries and the plastic. Even so, the sugar coating may begin to melt after a few hours. Should the coating melt, you can reapply it without doing any particular damage to the cranberries -- they won't look as pretty the second time around, is all. They should keep for 2 or 3 days (if you can avoid eating them all, piece by piece, absentmindedly).

If you're the sort of person who hates wasting anything, you could add a few tablespoons of water to the remaining (pretty-in-pink) syrup in the pot, heat it and stir to dissolve, and pour it into a sterilized jar/bottle for use in tea/coffee/cocktails during the holiday season. It shouldn't have much if any flavor from the cranberries, and should last at least a month if you store it in the fridge until it's needed.

Friday, November 20, 2009

thanksgiving panic planning

Thanksgiving is next week! I'm shocked, frankly, shocked. And trying to come up with something to bake.

Traditionally I've done a linzer torte, which is like a very large spiced almond cookie with raspberry jam-type filling and pain-in-the-tuchus latticework on top -- but my dear family nouveau includes a child with a nut allergy, so I figure that probably, grinding a bunch of almonds into airborne powder in their kitchen would be rude.

A couple years back I made my other favorite holiday dessert, my mother's apple cake (which I posted a pear riff on awhile back -- most of my friends dislike cooked apples). I'm bored with that, though! Hello, my name is Lauren and I am Short Attention Span Theater.

This pear-butterscotch pie, which The Kitchn kindly pointed me towards, is a serious contender. The only Thing about it is that I hate pastry crust. Hate. Seriously. Don't tell me it's not that hard. The salt in my pie crusts comes from my tears of suffering and humiliation. Yes, even the storebought kind. Hate. Pastrycrust.

This is also the Thing about this s'mores pie, which also sounds wondermous.

Perhaps I shall grow some lady-balls and make one of these happen.

Unless you have any better, non-pastry-crust-related suggestions?

Saturday, October 3, 2009

recipe: banana-pecan-date bread

Baking is one of my coping mechanisms. It keeps me busy, and then I get to eat/feed other people comfort food. My project for the evening was a riff on my friend's family banana nut bread recipe. The dates add a tangy sort of contrast to this sweet, homey quick bread, and the pecans are sweeter than the traditionally used walnuts.

The only real secret to any quick bread recipe (y'know, anything you can put in a muffin tin/get to rise without yeast) is to not work the batter much at all after you add in the flour. You really only need to get the flour wet -- mixing it too hard will create too much gluten and make your bread/muffins tough. And nobody likes tough muffins.

Banana-Pecan-Date Bread

INGREDIENTS

1 1/2 cups all-purpose flour
1/2 cup whole wheat flour
1 tsp baking powder
1/4 tsp salt

1/2 cup white sugar
1/2 cup brown sugar
1 stick (1/2 cup) butter, melted
2 eggs
3 ripe bananas, sliced
1 tbsp vanilla

1/2 cup pecans, finely chopped
1/3 cup dried dates, pitted and chopped small

METHOD

Preheat your oven to 350 degrees F. Spread your pecan bits out in a pan and stick them in the oven until they begin to get fragrant -- 5 to 10 minutes, depending on how fast your oven heats up. (You want them to get a little deeper in color, but be careful not to burn them!)

Meanwhile, butter & flour a bread loaf pan. Yes, even if it's nonstick!

Measure out your dry ingredients (flours, baking powder, salt) into a bowl and combine them by stirring with a whisk. (You could sift them together if you're more motivated than I am.)

In a separate bowl, combine the butter and sugars. Hit 'em with an electric beater on low-to-medium speed for ~2 minutes, or until the mixture increases in volume and lightens in color a bit. Add the eggs, vanilla, and bananas, and beat for another minute or so on low-to-medium, or until the bananas are pretty well mashed up and mixed in -- smallish, pea-sized chunks are okay, but you don't want pieces much larger than that.

Now, my friends, it is time for the dry ingredients, so put that mixer down. Gently stir your dry mixture into your wet mixture, juuust until it's incorporated. A couple dry spots are okay, 'cause after you gently stir in the toasted pecan bits and the chopped dates, you're gonna leave the batter alone for five whole minutes. Five! Just set the bowl down and walk away. (I know this because Alton Brown knows this.) While you're checking your Twitter page, the flour will be busy soaking up some extra moisture without creating any of that nasty tough-muffin gluten.

When you come back, pour the batter into the prepared pan (you'll notice that most any flour pockets will have disappeared, and the batter will have some air pockets in it -- this is a good thing) and pop that sucker into the oven! It'll take an hour or so to bake -- check it at 60 minutes, and leave it for another 5-10 if it's not a deep golden brown yet. Let it cool in the pan for a few minutes (to let it finish cooking & solidify a bit), then turn it out onto a cooling rack and let it sit for another few minutes (for the same reason) before slicing and devouring.

Sunday, September 13, 2009

Girl Talk Any Day I Please: halloween costumes

Aside from a couple years in high school when I was clearly way too cool to dress up for Halloween (I was on the yearbook staff so I'm not sure how I came to that conclusion), I've always kinda reveled in Halloween costumes. And costume-party costumes. And Rock-Band-party costumes. And hay-we're-bored-let's-play-dressup costumes. I have way more costume pieces than shame, folks.

Freshman year of college I did I fairly half-assed Trinity costume for Halloween -- happily, no photographs survive. (I won Sexiest Costume at my dorm's party, but had already left to go dick around online, so they gave it to the runner up. Did I mention not-cool-at-all?) Sophomore year I did Death, from Sandman:


(I was baking cookies for Kate-the-probable-photographer & Gabe's Silent Hill-themed party.)


Junior year I didn't dress up 'cause I went to signing Bruce Campbell was doing for his autobiography, If Chins Could Kill, in Orlando. He stayed until everyone got through the line, which took longer than they'd suspected 'cause he was being awesome and chatty and taking pictures with people:


(That's Steve [dressed as Arthur Dent], Bruce, Gabe, and me. I guess I'm dressed as a crazy fangirl?)


A few of us went to visit friends at FSU my senior year, and I reprised my Trinity costume with my still-not-quite-short-enough haircut:


(A Matrix tableau: Steve [as Nightcrawler] impersonating Neo, schoolgirl!Aaron impersonating an Agent, and me impersonating, y'know, Trinity.)


In '05 I had quiet, noncostumed hangouts with my family nouveau, and in '06 I was a goth fairy, which I can't find any photos of. In '07 I went as Becky, from Sin City, but again photo evidence is scarce. This is the best I can find:


(I'm on the couch, not the nice blond lady. Perhaps obviously?)


Following the theme of costumes for which I don't have to wear wigs, I was Daria Morgendorffer in '07. And can't find any photos! But there's lots from last year, when a few friends and I did Dark Knight-style (less cartoony, more scary & realistic) DC comics villains. I was Harley Quinn:


(With Phil as the Joker... photo by Matt, I think.)


And I have no idea what I'm gonna do this year! I've always wanted to do an Audrey from Little Shop of Horrors, or Elvira, ooor lots of stuff that I can't think of right now. Anyone have any suggestions?


Hey, I wrote this entry for the new, shiny Girl Talk Thursday, even though it is totally not Thursday anymore! Come join the conversation:

Friday, November 14, 2008

recipe: Spiced Pear Cake

This recipe is based on a German/Jewish Apple Cake that my mother used to make around the holidays. She died when I was a kid, and her recipe box was lost in my father's & my resulting move to Florida -- we moved to be closer to my father's mother, who could look after me while my father was at work. When I started getting into baking in college,* I tried to reconstruct the recipe based on shoddy memories of being 6 years old and up to my little elbows in thin-sliced, cinnamon-sugar--coated apples. It never quite came out the way I remembered it, and it wasn't until I was 25 that I thought to ask my family about it -- upon which I received a recipe card in the mail in about a week, hand-written in my grandmother's neat script with the kind of blue ballpoint that she'd always come back with a box of after visiting her State Farm agent.

It'd be lovely for Thanksgiving -- the cake comes out super-dense & moist with a sort of buttery toffee flavor, and the spices are classic fall fare. I modded the recipe to use pears instead of apples 'cause I've got a lot of friends who don't like cooked-apple texture. (The pears are nice, but I still recommend apples -- and the fruit is sliced so thin that it ends up more soft-caramely than pulpy/mushy anyway.) It can be served warm or cool or chilled, with ice cream if you want, or a melted chocolate drizzle maybe, or plain and with coffee.


Spiced Pear Cake

INGREDIENTS

4 medium pears
1/2 tsp ground ginger
1/2 tsp ground cinnamon
1/2 tsp ground nutmeg
pinch of ground cloves
1/4 cup sugar

2 eggs
3/4 cup sugar
1/2 cup unsalted butter, gently melted (but not hot)
1/2 vanilla bean, scraped (or 1 tsp vanilla extract)

1 cup flour
1 tsp baking powder
1/2 tsp salt


METHOD

Peel the pears and slice thin (but not VERY thin... maybe 1/8th of an inch. thick enough so they don't fall apart on you). In a bowl, toss the slices gently with the spices and 1/4 cup of sugar and then set aside.

Beat the sugar and eggs together with an electric mixer until the mixture lightens and expands a bit in volume (maybe 2 minutes?). Add the butter and beat for another minute or so, then stir in the vanilla. (You could do all this with a whisk if you needed a workout.)

Sift together the dry ingredients. Stir the dry mixture into the wet mixture (adding it in 2 or 3 batches works well) until the batter is smooth. Grease an 8x8 baking pan (if it's not nonstick) and pour in the batter. A 9-inch round should also work.**

Now is a good time to preheat your oven to 350.

Take the bowl of now-macerated pear slices and discard some of the pear juice/melted sugar that's collecting in it -- you don't want to add too much moisture to the cake. Then, starting about 1/8th of an inch in from the outer edge of pan, lay the pear slices down on top of the batter one at a time, parallel to the sides of the pan, overlapping each slice just a bit. Go around the pan in a ring, and then start a second ring inside the first, overlapping the rings a bit, too. Keep going until you fill the pan or run out of fruit (hopefully the former). This will be a pain in your ass.

When you're done, pop the pan in the oven for ~60 minutes. (If you ended up using a 9x9 pan 'cause you're a naughty baker like me and don't own all that many pans, try ~40 minutes.) When it's done, the cake should be pulling away from the sides of the pan and poking up between the pear slices, which should be golden-caramel-brown, and a toothpick near the center should come out clean. Allow pan to cool at least 15 minutes before serving, but it's even better the next day. Preferably for breakfast.


SUPER-SEEKRIT SHORTCUT & OTHER NOTES

If you wanted to, you could chop the pears into smallish chunks instead of slicing them all fancy, and just kinda scatter the macerated chunks over the batter. But the fancy slices really are pretty.

If you're going to use apples, I like Granny Smith 'cause I'm quaint like that but any tart, firm, baking-approved apple would be okay. Just slice the apples VERY thin if you're doing the fancy slicing thing -- ~1/16th of an inch, or as thin as you can get them consistently and still be able to handle them. And add up to 1/4 cup more sugar during the maceration process, and make sure the mixture sits for at least an hour. Apples are stubborn.

The spices you add to the fruit are a flavor adventure (i.e., spice to taste). I think 1.5 tsp of total spice is a good amount to aim for, though.

* Man I wish I didn't know enough potheads that this sounded less than innocent.

** Baking 911 has a good pan-volume chart for use in emergency substitutions.

Monday, September 22, 2008

welcome

It was almost chilly this morning! This makes me want to drink coffee, bake squashy pie, find my sweaters, go for a walk under oak and maple trees, procure apple cider, snuggle, wear a scarf, read a ghost story, and be in elementary school again. Not necessarily in that order.

Welcome to Autumn and this blog, folks. I'm Lauren, and I'll be your dorkful host. Pardon my Webdust as I figure out how the hell this thing works, and stay tuned for actual content, including a recipe that involves nearly equal parts chocolate chips and bacon.

This is what I looked like as recently as Labor Day weekend. [Photo by Cyclone Larry, who was really excited that I wasn't wearing the cupcake shirt that I am mysteriously always wearing when he sees me.]