Showing posts with label cookies. Show all posts

Wednesday, December 19, 2012

gluten-free christmas cookies - almond, orange, clove

gluten-free christmas cookies

For me, Christmas cheer means cookies, and I'm not about to leave my gluten-free friends out in the cold. With bright orange, warm clove, and sweet almond, these got the ultimate thumbs-up -- total (joyful) annihilation -- on tree-trimming day.

A basic, chewy snickerdoodle recipe is a lovely start for cookies with no wheat flour -- it's forgiving as ol' St. Nick himself. (Let's hope Krampus isn't around.) If you have a preferred flour other than rice or coconut (even wheat), it'll probably work -- just keep the total flour input at 1 and 1/3 cups.

Gluten-Free Christmas Cookies
Makes 2-3 dozen

INGREDIENTS

1/2 cup almond flour (store-bought or home-ground -- grind first, then measure)
1/2 cup rice flour
1/3 cup coconut flour
1/2 tsp baking soda
1 tsp cream of tartar (if you don't have this, omit the baking soda and use 1 1/2 teaspoons baking powder to substitute for both)
1 orange worth of zest (~1 tbsp)
scant 1/4 tsp ground cloves
1/8 tsp salt

8 tbsp (1 stick) unsalted butter, room temperature
3/4 cup granulated white sugar
1 egg, room temperature
1 tbsp fresh orange juice


METHOD

Set our your egg and butter and get out your nonstick baking sheets -- or prep regular ol' ones with parchment paper, a baking mat, or a good coating of butter and a tapped-even sprinkle of flour. Preheat your oven to 400 degrees F.

Measure your dry ingredients (zest, almond meal, coconut flour, rice flour, salt, and leavening agent/s) into a medium bowl and whisk to combine.

In a larger bowl, add your butter and sugar. Using an electric beater on medium speed, cream them together for 2 minutes. Add your egg and orange juice and beat for another minute to incorporate them evenly.

Add your dry ingredients to your wet ingredients and mix by hand to combine. It'll be fairly wet and sticky. Drop rounded teaspoons of dough onto the prepared baking sheets, leaving 2 inches between each to allow for spreading.

Bake for 8-10 minutes -- check 'em at 8. When they're done, they'll be golden around the edges and will look dry on top. Also, they'll be more springy than mushy if you poke the top with a finger.

Leave 'em on the baking sheets for a couple minutes to firm up, then remove them to a wire rack until they're cool enough to eat. Or store, I guess. These keep in a sealed container for two or three days, though they'll lose some of their crisp. Try layers of parchment paper between the cookies to preserve crispness.

If you'd like to make the dough ahead, you could seal it up and refrigerate it for up to a week or freeze it for up to 3 months, then bake on demand.

gluten-free christmas cookies

Sunday, October 3, 2010

guest post on Ginger Lemon Girl

During all the hubbub of September, I completely forgot to mention: A cookie recipe of mine appeared last month as a guest post on Ginger Lemon Girl, a guilt-free, gluten-free cooking blog! My lemon-lavender-almond cookies, moist & chewy with almond meal, really lend themselves to being made gluten free, so I reworked the recipe for Carrie & her friendly readers. (I also made the baking instructions less rambly, 'cause, guys, I tend to go on a bit. Perhaps you've noticed?) Check out the resulting version of the recipe here:

Gluten-Free Lemon-Almond-Lavender Cookies

lemon lavender almond cookies, photo (and cookies) by Lauren Vogelbaum

Tuesday, March 23, 2010

recipe: lemon-almond-lavender cookies

My friend Melissa keeps bringing me things from Mountain Farm, a lavender, blueberry, and dairy goat farm (quite possibly the best combination of anything ever) up in North Carolina. I highly recommend their goat milk soaps. Unless you are hungry, in which case I recommend not their soaps, no matter how delicious the green tea & ginger one smells. 'Cause they also sell culinary-grade lavender (I've also found this hidden in with the tubs of looseleaf tea at Dekalb Farmer's Market if you're in the area), which is brilliant in (who knew) tea and baked goods. And supposedly in savory applications as well.

Inspired by a recipe in the little cook booklet Melissa brought me after her last trip to Mountain Farm, I decided that lavender cookies needed to happen. I based the dough on my snickerdoodle recipe 'cause I wanted something chewy, and decided to add a lot of almond meal and lemon zest because lavender is so powerfully herbal that I figured two other bitter flavors might help mellow it out. I adore the result -- these cookies are buttery & chewy, with a lovely hint of bitterness from the lemon & lavender and a sweet toastiness from the almond meal. Too delicate for coffee, I think they'd be perfect with a cup of black tea. Perhaps with a bit of lavender brewed in?

lemon lavender almond cookies, photo (and cookies) by Lauren Vogelbaum
The recipe works really well with rice flour instead of wheat flour, too! I made a batch for a friend who had recently discovered that she has a wheat allergy, and although they were a bit crumbly right out of the oven, they firmed up into perfect chewiness the following day. I think the extra fat content from the almond meal helped. (Gluten-free baking tip: Always sift your wheat-alternate flour before baking with it, especially if it's ricey. It'll help get any super-grainy bits out.)

Lemon-Almond-Lavender Cookies
Makes 2 to 3 dozen

INGREDIENTS

1.5 tsp dried lavender buds, minced fine
1 lemon worth of zest (~1 tbsp), minced
1/3 cup almond meal (store-bought or home-ground from blanched [skinless] almonds -- grind first, then measure)
1 cup all-purpose flour
1/2 tsp baking soda
1 tsp cream of tartar (if you don't have this, omit the baking soda and use 1 1/2 teaspoons baking powder to substitute for both)
1/8 tsp salt

8 tbsp (1 stick) unsalted butter, room temperature
3/4 cup granulated white sugar
1 egg, room temperature
1 tbsp lemon juice
1 tbsp amaretto, if you happen to have some (a teensy dash of almond extract might not go awry as a substitution for this -- maybe 1/4 tsp?)

~1/4 cup granulated white sugar for rolling the cookies in
An extra few pinches of lavender buds for decoration


METHOD

A half hour before you get started, set out your egg & butter so they'll start warming to room temperature. (Should you forget to do this like I usually do, ten seconds in the microwave will soften the butter, but there's no helping the egg. The tops of the cookies will be a little less crackly, is all.)

When you're ready to go, set your oven preheating to 400 degrees F. And butter & flour your baking sheet, if that's your thing. I sort of like buttering & flouring everything I bake on these days.

Combine your dry ingredients (lavender, zest, almond meal, flour, salt, and leavening agent/s) in a medium bowl and gently whisk until everything is thoroughly combined. As few lumps as possible!

In a larger bowl, add you butter and sugar. Using an electric beater on medium speed, cream them together for 2 minutes -- you're looking for a lighter color and increased volume. Add your egg, lemon juice, and any amaretto/almond extract you're using and hit the batter with the beater for another minute to incorporate them evenly.

Add your dry ingredients to your wet ingredients and mix manually with a spoon to combine. No dry pockets!

Place your extra ~1/4 cup of sugar in a small dish or on a small plate. Take a rounded teaspoon of dough from the bowl and roll it into a ball in your hands, then roll it around in the sugar to coat. I've found that these bake more evenly and awesomely when they're flattened a bit -- you can either press each ball into a sort of scallop-shaped disk with your fingers or just put a thumbprint in each as you place them on the baking sheet. A few inches apart, yes. Sprinkle two or three lavender buds on top of each cookie.

Bake for 8-10 minutes (I needed only 8.5). You can tell these are done when they're golden around the edge and look dry on top. Also, they'll be more springy than mushy if you poke the top with a finger.

Allow the cookies to cool for a couple minutes on the baking sheet, then remove them to a wire rack until they're cool enough to remove to your belly a decorative plate that you will obviously share with your friends.

These keep very well in a sealed container for two or three days. If you'd like to make the dough ahead, you could seal it up and refrigerate it for up to a week or freeze it for up to 3 months, sans sugar coating, and then coat & bake on demand.

Monday, March 8, 2010

recipe: chocolate Guinness cookies

I made these beer-flavored cookies for the Great Guinness Toast a couple weeks ago. The recipe is cobbled together from my double-chocolate bacon cookie base and this White Beer Cookie recipe from an episode of Ultimate Recipe Showdown on Food Network that I never watched, but discovered anyway through the wonderment of Google dot com.

They took a bit of trial and error -- I wound up using sugar in the beer syrup instead of honey (which overpowered the Guinness), and my attempt to compensate for the sugary beer syrup by adding less sugar to the dough created tiny cakes rather than less-sweet cookies. (I do the Science so you don't have to.) The end result was a cookie with a hit of chocolate at first taste and an addictively bitter bite at the back of the palate. They go perfect with a pint! And if you're looking to bring something to a St. Patrick's Day party, I can guarantee that adding stout to cookies will make them more Irish than green food coloring.

Chocolate Guinness Cookies
Makes ~24 cookies. Adapted from Kathy's chocolate cookie recipe on Allrecipes.com and from Sean LaFond's White Beer Cookies, with thanks to Sarah's Sweet Tooth for testing.


INGREDIENTS

Guinness syrup

2 bottles of Guinness (12 oz each)
5 tbsp sugar

Cookies

1/2 cup (1 stick) unsalted butter, softened
2/3 cup white sugar
1/3 cup brown sugar
1 egg, room temperature
1 teaspoon vanilla extract (or 1/2 a vanilla pod, scraped)
1/3 cup prepared Guinness syrup

3/4 cup all-purpose flour
1/3 cup cocoa powder
1/8 teaspoon salt
1/2 teaspoon baking soda [NOTE: If you're using Dutch-process (aka pre-alkalized) cocoa powder, you should use baking POWDER instead. Otherwise you'll end up with oven-baked pancakes.]

1 tbsp powdered (confectioner's) sugar for pretty


METHOD

Set out your butter and egg first to allow them to start warming up to room temperature.

For the Guinness syrup, pour both bottles of beer into a small saucepan and add the sugar. Set the pan over medium-high heat and bring the liquid to a boil, stirring to help the sugar dissolve. When the liquid hits a boil, lower the heat to a busy simmer and let the liquid reduce to a syrup, stirring more than occasionally but less than frequently. It'll take 20 minutes or more -- you're looking for it to become a rich amber color, and gain the consistency of thin honey or thick maple syrup. Also, it'll begin foaming really aggressively when you stir it (more aggressively than that... wait for it...) and will be almost exactly 1/3 cup in volume.

Take the saucepan off the heat and transfer the syrup to a small dish to allow it to cool down.

Get your oven preheating to 350.

In a medium mixing bowl, combine your dry ingredients (flour, cocoa, baking powder or soda, and salt) and stir with a whisk to fully incorporate. (This helps break up any clumps and get the leavening agent fully distributed.)

In a large mixing bowl, combine your softened butter (you can just nuke it for a few seconds if, like some authors of this recipe, you forgot to set it out earlier) and your white & brown sugars. Cream them together with an electric blender on medium speed for 2-3 minutes, until the mixture has lightened in color and begun to hold the wavey shapes that the beaters sculpt it into as they pass through it. Add your vanilla, egg, and Guinness syrup, and blend for another minute or so until everything is incorporated.

Put down the beater! You'll want to use a spoon or spatula for this next part so that you don't overwork the flour. Add the dry mixture to the wet mixture and stir gently (but, y'know, firmly) until no dry pockets remain. The dough will be sticky.

Butter and flour a baking sheet (unless it's REALLY high-quality nonstick). Roll a rounded teaspoonful of dough into a ball in your hands and then flatten it slightly before placing it on the sheet, and repeat until you fill the sheet, leaving a couple inches between each cookie. (If you don't like getting your hands dirty, you can drop the dough onto the sheet directly from the spoon and flatten it slightly once it's on there, but I find that they come off easier when you do the flattening beforehand.)

Pop the sheet in the oven and bake for 8-10 minutes, or until the tops of the cookies look dry and provide a bit of springy resistance when you poke them (carefully, folks) with a fingertip. Remove the sheet from the oven and allow the cookies to continue cooking on it for a couple minutes before transferring them to a rack (preferred) or plate (less preferred) to cool.

For the pretty: Once the cookies are cool to the touch, put maybe a tablespoon of powdered sugar in a fine mesh sieve and hold the sieve over the plate of cookies. Tap the edge of the sieve to dust the powder onto the cookies. Pretty! (If you're feeling more ambitious than I was that night, a perfect topping/decoration might be a drizzle of white chocolate. Maybe with a bit of Irish cream mixed in carefully as the chocolate cools?)

I can't tell you how they hold up after the first day 'cause none of them survived the night. If you find out, you tell me. (Hypothetically, they should do okay in a sealed container for a day or two before they start going stale, and 10 seconds or so in a microwave should help perk them up after that.)

Wednesday, December 2, 2009

recipe: drunken-raisin oatmeal cookies with pecans and tangerine

I'm a food blog junkie, infatuated with foodie recipe sites, and a sucker for slick, high-production-value cookbooks. And I'm here today to tell you: Sometimes the recipe on the back of the brand-name lid really does work best. For example, my favorite pumpkin pie is the kind you make with a can of Libby and the recipe that's printed on the label. (The first year that my family nouveau & I hosted our See We Are Totally Grownups Thanksgiving, we slaughtered a pumpkin and made the pie from scratch. It wasn't as good.) Same goes for oatmeal cookies -- honestly, the Quaker Oats kids know what they're talking about. They've made some cookies in their time. Trust in the label. It wants you to eat delicious cookies.

....Okay, confession: I don't entirely trust in the label. 'Cause, see, the Internet told me that parbaking the pie crust will prevent sogginess and that simmering the pumpkin and cream together will make a richer filling, and the Internet never semi-rarely steers me wrong. I can never just follow a recipe. This is possibly why I started a food-related blog.

In the case of oatmeal cookies, I mostly just add a few little touches for maximum deliciousity. The base recipe creates soft, chewy, comforting oatmeal cookies. With a few little additions, I wind up with something that tastes like home and warm and the holidays: pecans for a buttery crunch, whole wheat flour for nutty richness, cloves and tangerine zest for tastes-like-Christmas, and whiskey for smokiness & extra moisture [and also 'cause dude, most things about the holidays are better when you (or, y'know, your raisins) are a little tipsy].


Drunken-Raisin [Vanishing] Oatmeal Cookies, with Pecans and Tangerine
Adapted from the inside of the Quaker Oats lid. Makes ~3 dozen cookies.


INGREDIENTS

1/2 cup raisins (dried figs would also be awesome, just chop them raisin-sized)
1/4 cup whiskey (or bourbon -- you want something sweet rather than peaty, I used Jack Daniels)

1/2 cup all-purpose flour
1/4 cup whole wheat flour
1/2 tsp baking soda
1/2 tsp ground cinnamon
1/8 tsp ground cloves
1 tangerine (or orange, or clementine, for 1 tsp of zest)

1/2 cup packed brown sugar (light or dark is fine, I like dark)
1/4 cup granulated white sugar (minus a tablespoon if you like less sweet desserts)
1 stick unsalted butter (we're gonna soften it)

1 egg
1 tsp vanilla extract

1 1/2 cups whole oats (regular or quick-cooking)
1/3 cup pecans (we're gonna chop them small & toast them)


METHOD

At least an hour before you start working, measure out your raisins into a ramekin, small bowl, or coffee mug. Add the whiskey and stir. Set aside, and stir whenever it occurs to you that you haven't in awhile. (You could do this the night before, even, if you have way more foresight than I do.) Don't worry, all the alcohol will bake off. No one will get tipsy from the finished cookies.

When the raisins have soaked up some of the whiskey, you're ready to start working. Set out your butter and egg to allow them to warm up a bit.

Chop your pecans to pea-sized-or-smaller chunks, and toast them until fragrant and warm-golden colored. That'll be ~2 minutes in a toaster oven or in a pan on medium heat on the stovetop, ~10 minutes in an oven that's just been turned on and is heating up to 350 (which is what the cookies will bake at), or ~5 minutes in a hot oven. Watch them carefully. If they burn/blacken, start over with fresh pecans. Set aside.

Measure out your dry ingredients (flours, baking soda, cinnamon, and clove) into a medium bowl and whisk to combine. Zest your orange-colored citrus of choice, and if the pieces are more strip-like than granular, chop them fine (a teaspoon is approximately what you get from one tangerine or clementine, or ~1/2 of an orange, if you're not being extremely industrious about zesting). Add the zest to the dry stuff and whisk again to combine.

If you haven't heated up your oven yet, now would be a good time to get that going towards 350.

Measure your sugars into a separate, larger bowl and add your softened butter in chunks. Cream them together using an electric beater on medium for 3 minutes, then add your egg and vanilla. Use a spoon to strain 2 tablespoons of whiskey off of the raisins, and add that to the wet mixture as well. Use that electric beater on medium again for 1 minute to combine.

Add your dry ingredients to the wet ones, and stir by hand to combine. Drain any remaining whiskey off your raisins, and add the raisins to the bowl. Also add the toasted pecan bits and the oats. Stir, again by hand, to combine.

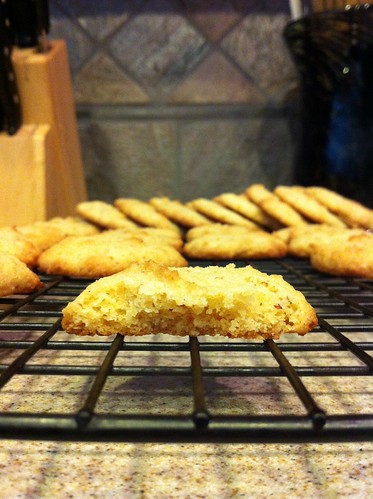
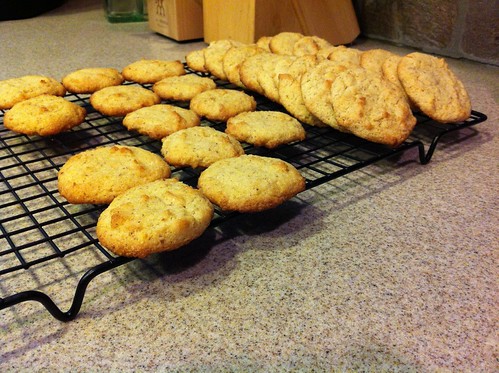
Drop by rounded tablespoon (ping-pong ball sized bits) onto a cookie sheet and bake for 10 to 12 minutes. They'll look a little shiny and underdone in the very middle of their tops, but they'll continue cooking a bit after they come out, so that's okay. Cool for 10 minutes on the pan, then carefully remove them to a wire rack to cool completely. They'll be crumbly while they're still warm, and chewier once they're cool. I'm a chewy-texture fan, so I'd recommend waiting.

If you don't need that many cookies right now, you could refrigerate the dough for an hour or so until it's solid enough to work with, and then mold rounded tablespoons of dough into balls, wrap them in plastic wrap, and freeze in a plastic bag or container for up to a month. (Just let them defrost in the fridge for a few hours before baking, and use the full 12 minutes of baking time to compensate for the dough being chilly going in.)

Store the cookies in an airtight container, and they should last a week. Freshness-wise, anyway. They don't call them "vanishing" for nuthin.


OH HAY, A TIP

If, like I did when I made these, you find yourself without brown sugar but with both white sugar and molasses, you can haz a substitute. White sugar is just brown sugar with the molasses removed. So, to substitute for a half cup of dark brown sugar, use a half cup of white sugar plus 2 to 3 teaspoons of molasses. (I say "2 to 3" because honestly, measuring molasses is an imprecise science. Just get about that much in the mixing bowl, and don't worry about it.)

Thursday, October 15, 2009

recipe: snickerdoodles

I visited my mother's parents every summer when I was growing up. My Grandma Lou baked every day: loaves of butter bread, cinnamon rolls with walnuts and maple icing, fruit pies, angel food cakes, oatmeal raisin cookies, snickerdoodles. My memories of her bright, busy kitchen are a huge part of why I find baking and baked goods such a comfort.

A good friend of mine, Phil Clippinger, died in a car accident on Saturday, September 26th. (I've had a memorial post in the works for weeks, but haven't been ready to talk publicly about everything yet.) The week after his death, I spent a lot of time baking -- it kept me busy and fed my friends -- but on the morning of his funeral, I found myself with a kinda hilariously Jewish need to bake. The funeral was a huge Catholic mass, with a choir, and kneeling, and billows of incense smoke pouring through the thick slant of sunset that fell over his coffin. It's not like his family was sitting shiva. And it's not like I'm really that Jewish -- only half my family is, on my father's side, and I don't even observe the high holy days unless someone else does the planning. But when I woke up on the morning of Phil's funeral, I had to make something to bring to his family. And snickerdoodles were the most comforting thing I could think of.

This recipe makes ~3 dozen chewy, buttery, cinnamon-spiced cookies, and can easily be doubled if you need to feed everyone.


Snickerdoodles
Adapted, as usual, from smittenkitchen.

INGREDIENTS

1 1/3 cups all-purpose flour (use a full 2 3/4 cups if you're doubling)
1/2 tsp baking soda
1 tsp cream of tartar (If you don't have this, omit the baking soda and use 1 1/2 teaspoons baking powder to substitute for both)
1/8 teaspoon salt

8 tbps (1 stick) unsalted butter, room temperature
3/4 cup white sugar
1 egg, room temperature

1/8 cup sugar
2 tsp ground cinnamon

METHOD

A half hour before you get started, set out your butter and egg to allow them to approach room temperature.

When you're ready to start, preheat your oven to 400° F, and prepare a cookie sheet with butter, parchment paper, or a silicone baking mat if you're into that kind of thing. (I've got a nonstick sheet that things come off of pretty well all by itself -- I've found that greasing it just makes the bottoms of cookies burn, and putting down parchment or a silicone mat prevents cookies from getting good & crispy on the bottom, so I leave mine alone.)

Measure out your dry ingredients (flour, baking soda, cream of tartar, and salt) and whisk them to combine.

In a larger bowl, measure out your butter and sugar. Beat them with an electric mixer on medium speed for 2 minutes, or until they've begun to lighten in color and increase in volume (this is called creaming and it's how air gets into the batter, and thus what gives cookies their awesome chewy-tender texture -- if you creamed the mixture for a couple minutes more, you'd end up with a more airy, cakelike texture in your cookies). Scrape down the bowl then add your egg, and beat the mixture on low until the egg is fully incorporated (1 minute or so).

Pour your dry mixture into your wet mixture and stir manually until everything's incorporated. If the dough seems too sticky to work with, add an extra tablespoon or two of flour.

Combine your cinnamon and 1/8th cup of sugar in a small dish, bowl, or ramekin -- something you'll be able to roll balls of dough around in. Stir to combine.

Use a table spoon (like, a thing you'd eat with) to scoop out a bit of dough -- think something maybe 1 inch to 1.5 inches in diameter, or a bit smaller than a ping pong ball. Roll it between your palms gently to shape it into a ball, and then drop it into the cinnamon sugar mixture. Roll it around to coat it with awesome, and then place it on the baking sheet. Flatten it into a disc maybe half an inch thick and ~2.5 inches in diameter. Repeat with a bunch more cookies! They shouldn't spread too much, so you can place them ~2 inches apart or so on the sheet.

Pop the sheet in the oven and bake for 8-10 minutes (or until ~1 minute after your kitchen starts to smell like awesome, or until the cookies have puffed up and then deflated, or until poking one gently on the top yields slightly springy resistance). Allow the sheet to cool for ~5 minutes once it's out of the oven, and then transfer the cookies to a cooling rack until they're just cool enough to serve.

To mix ahead: This dough freezes better if you don't coat it in cinnamon sugar first (the sugar coating may melt when the cookies defrost). So if you're mixing ahead, just roll the dough into balls and freeze them: Either wrap them in plastic so they aren't touching and seal them in a baggie/container, or freeze them on a sheet pan for ~1 hour before tossing them in a baggie/container. Defrost them in your fridge for ~1 hour, roll them in cinnamon sugar, and bake more or less as usual (you might need to add a minute or so to the cooking time).

Monday, October 5, 2009

recipe: chocolate chip pecan brown-butter cookies

These cookies were inspired by a brown-butter cookie that Maria (MommyMelee) makes, my personal quest for the Ultimate chocolate chip cookie, and a random craving for pecans. They bake up thick and soft, with a crisp-crunchy edge and a nutty richness from the pecans and browned butter.

For anyone who's never done it, browning butter is magical, and something I think I want to do for all my recipes that call for melted butter from now on. Similar to how toasting nuts or searing meats brings out their full flavors, gently cooking butter before using it in a recipe deepens the taste and color of the final product. The outcome in these cookies is a decadent and craveable comfort food.

Chocolate Chip Pecan Brown-Butter Cookies
Adapted from Deb @ smittenkitchen, who adapted it from AllRecipes.com.

INGREDIENTS

3/4 cup (a stick and a half) unsalted butter

2 cups all-purpose flour
1/2 teaspoon baking soda
1/2 teaspoon salt

1 cup packed dark brown sugar (light would be fine too)
1/2 cup white sugar
1 tablespoon vanilla extract
1 egg
1 egg yolk

2 cups semisweet chocolate chips
1/2 cup pecans, finely chopped

METHOD

First, get your butter browning: Cut your butter in chunks into a small, shallow pan, and set it over low heat. Really low. Just above "warm", and certainly not as high as medium. The idea here is to just toast the butter -- you want it to melt & separate, and then get just hot enough so that all the milk solid bits sink to the bottom, and then cook just long enough so that those milk bits caramelize, becoming fragrant and turning a lovely warm shade of golden brown. The whole process should take maybe 5 to 10 minutes, and your butter should bubble but never go above a simmer. Stir it frequently to keep all the milk bits from sticking to the sides or bottom of the pan. When the color has deepened and the butter smells like maybe you want to stick your face in it, take the pan off the heat and set it aside.

Meanwhile, or afterwards if you don't like multitasking, preheat your oven to 325°F. Take your chopped pecans (I like them to be pretty much minced with a few slightly larger chunks 'cause I don't like too much crunchy texture in my cookies, but you can adjust to taste -- I'd say anything up to pea-sized chunks would work), spread them onto a baking sheet, and pop them in the warming oven for 5-10 minutes or until they're fragrant and have slightly deepened in color. Set them aside.

Measure out your dry ingredients (flour, baking soda, and salt) and whisk them to combine.

In a separate, larger bowl, measure out your sugars and add in the browned butter. Beat them together with an electric mixer for about 2 minutes on medium. You're looking for the mixture to increase a bit in volume and lighten a bit in color. Add the vanilla and eggs, and beat for about a minute until the mixture is creamy and well incorporated.

Put down the beater, and mix in the dry ingredients by hand (well, by spoon/spatula, unless you really want to use your hands). Then gently fold in the chocolate chips and the toasted pecans. The dough will be soft and sticky, and at this point, you could refrigerate it for up to 24 hours before baking. (David Leite, who I trust in all things, researched & recommends refrigerating cookie dough for about this long to allow everything to combine & settle into itself. Guys, I don't have 24 hours' worth of cookie foresight. If you happen to, though, let me know how the refrigeration thing works for you.) If you find the dough too sticky to work with, cover the bowl with foil/plastic wrap/a large plate and pop it in the fridge for 10-20 minutes.

Next, use a spoon to scoop up a ping-pong ball sized or slightly smaller bit of dough, and roll it gently between your palms to form a ball. Drop it on a cookie sheet (greased or covered with parchment paper if you like) and flatten it out a little so that it'll cook more evenly. Leaving about 3 inches between cookies, fill your cookie sheet and bake for 8-12 minutes, depending on the size of the cookies and whether the dough has been chilled. (You're looking for the cookies to puff up and then deflate a bit -- an undone cookie will yield easily if you gently poke the top of it, and leave a sort of darkened, bruised-looking indentation, and will feel very soft. Gently poking the top of a done cookie will offer slight, springy resistance, and won't leave an indentation. Erm, relatedly, please use caution if you're going to go reaching into ovens to poke at cookies. Honestly, erring on the side of underdone is okay. They'll continue to cook a bit once they're out of the oven anyway.)

Once they're out, let the cookies cool for a couple minutes on the baking sheet, then remove them to a wire rack to finish cooling enough to shove in your mouth serve.

If you're going to put another sheet of cookies in to bake immediately, wipe down your cookie sheet with a clean, damp cloth or paper towel first (this gets the crud off the sheet and also cools it down enough so that it won't par-bake the new round of dough before it even hits the oven).

If you'd like, you could freeze the dough for baking later -- I just roll the dough into cookie-sized balls and wrap them in plastic wrap so that none of them are touching, then stick the whole caboodle into a ziplock bag or Tupperware and shove it in the freezer. Alternately, if you have the space in your freezer, you could place the dough balls on a baking sheet and let them harden in the freezer for an hour or so, after which they shouldn't stick to each other and could be placed directly into a ziplock bag/Tupperware. They'll keep in there for at least a week. Just remember to either let them defrost in the fridge for a few hours before baking, or to adjust your baking time (maybe 12-18 minutes) if you're doing them straight from the freezer.

Wednesday, October 1, 2008

recipe: Double-Chocolate Bacon Cookies

I like baking; it's edible chemistry. I can do chemistry. Cooking terrifies me 'cause it's all unregimented in ways that I never learned how to troubleshoot, but I find baking easy -- medatative, even. (Unless things are going badly and I can't figure out why, in which case I have occasionally tried to behead innocent bystanders with pie plates.) And I like feeding people, especially with things they've maybe never tried before or wouldn't bother making for themselves. So what exactly does a grammar monkey bake for a triple-bachelor birthday/house party/post-Piratepalooza party/all-around sin fest?

Double-Chocolate Bacon Cookies
(Makes 24 cookies)

INGREDIENTS

1/2 cup (1 stick) unsalted butter, softened
2/3 cup white sugar
1/3 cup brown sugar
1 egg, room temperature
1 teaspoon vanilla extract (or 1/2 a vanilla pod, scraped)
Dash of scotch/whisky, if you happen to have some (~1 tablespoon)

3/4 cup all-purpose flour
1/3 cup cocoa powder
1/8 teaspoon salt
1/4 teaspoon baking soda [NOTE: If you're using Dutch-process (aka pre-alkalized) cocoa powder, you should use baking POWDER instead. Otherwise you'll end up with oven-baked pancakes.]

1 cup semisweet chocolate chips
6 strips of smoky bacon (a little less than 1 pound uncooked; it should be ~1/2 c. once chopped)


METHOD

1) Set out your butter and egg to allow them to approach room temperature.

2) Cook off the bacon -- err on the side of extra-crispy, but don't burn it all to hell. Drain on paper towels and allow to cool completely, then run it through a food processor (or y'know a knife) until it's basically largish bacon bits. Set the bits on a paper towel to drain (again).

3) Preheat oven to 350 degrees F (175 degrees C).

4) In large bowl, beat the butter and sugar until light and fluffy -- a couple minutes on medium with an electric mixer should do it.

5) Beat in the eggs, vanilla, and any booze you're using until well incorporated -- another minute or so with an electric mixer on medium.

6) Sift or whisk together the dry ingredients (flour, cocoa, baking soda, and salt), and then stir the dry mixture into the wet mixture until the dough is smooth -- it'll be a bit sticky.

7) Stir the chocolate chips and bacon bits into the dough.

8) Drop by the rounded teaspoonful onto ungreased cookie sheets, and flatten slightly with your fingers.

9) Bake for 8 to 10 minutes -- the cookies should be crisp around the edges but still soft in the middle. Allow to cool slightly on the sheet before transferring to wire racks to cool completely.


NOTES

The amount of bacon you're gonna wanna use will depend on the thickness of slices and how much you wanna freak people out. I'd recommend buying a thicker-cut, higher quality bacon (I like Wright's) so that the bacon flavor really comes through without these feeling like meatcookies.

If the dough is too wet/runny/sticky to easily get onto the baking sheet after step 6, you can add maybe a tablespoon of flour and/or cover the bowl and set it in the fridge for ~10 minutes. If you wanted to, you could leave the dough in the fridge for a couple hours and come back later for the baking part.

You should probably warn people a lot that there's bacon in them there cookies -- I made a sign involving cartoon bacon holding hands with cartoon chocolate.

Many thanks to Kathy from AllRecipes.com for the chocolate cookie recipe I started with, to muffin of NeverBashfulWithButter.com for bravely blazing the bacon cookie path before me, to Vosges for providing me with my original choco-bacony inspiration, to Mike, Geoff, and Joe for being born, and to all the nice people who didn't punch me in the gut when I offered them a cookie with meat in it.